Snowflake
Why connect Sifflet to Snowflake?
By connecting Sifflet to Snowflake, you'll be able to leverage Sifflet's three core capabilities:
- Catalog all your data assets (with valuable metadata retrieved from Snowflake and enriched directly in Sifflet).
- Run monitors on your data assets to detect issues as soon as they arise and allow data consumers to trust the data.
- Benefit from Sifflet's end-to-end lineage that showcases your data pipelines and the assets upstream and downstream of your data platform.
Integration guide
You can integrate Sifflet with Snowflake by following these steps:
- Create a dedicated read-only role and warehouse (the warehouse is optional but recommended)
- Create a dedicated user. This user may use any of the supported authentication methods: username/password (deprecated), key pair, or OAuth2.
- Grant privileges to databases to be discovered and monitored
- Create the Snowflake source in Sifflet
1. Create a role and warehouse in Snowflake
To create the dedicated role and warehouse, you will need to run the following SQL queries:
-- Set the values for role name and warehouse name variables
set role_name = 'ROLE_CHANGE_ME'; -- VALUE TO REPLACE, make sure this role is not already created
set warehouse_name = 'SIFFLET_WAREHOUSE'; -- VALUE TO REPLACE

use role accountadmin; -- needed to create user/role

-- Create Sifflet Role
create role if not exists identifier($role_name);
grant role identifier($role_name) to role SYSADMIN;

-- Create a dedicated warehouse
create warehouse if not exists identifier($warehouse_name)
warehouse_size = xsmall
warehouse_type = standard
auto_suspend = 5
auto_resume = true
initially_suspended = true;

-- Grant the role access to the warehouse
grant USAGE,MONITOR on warehouse identifier($warehouse_name) to role identifier($role_name);

-- Grant access to query history
grant imported privileges on database "SNOWFLAKE" to role identifier($role_name);
Snowflake is case-sensitivePlease create the Snowflake entities with the following recommendations:
- Use an uppercase role name, make sure the role name is not already created.
- Use the same case for the warehouse name, database name, and schema name as the ones in your Snowflake instance.
2. Create a Sifflet user in Snowflake
In this step, you create the user that Sifflet will use to connect to your Snowflake instance, and grant it the role created in the previous step.
How you create the user depends on your chosen authentication method:
- key pair (recommended)
- username/password (deprecated)
- external OAuth2
Only follow the subsection corresponding to your chosen authentication method.
Key pair authentication
Follow the official Snowflake documentation to create a key pair, and then store both keys (the private and public key) since you will provide the user's private key to Sifflet in a later step.
Private key encryption: encrypted vs. unencryptedYou have two choices when generating your private key:
- Encrypted (recommended): This is the default and more secure option. Encrypted private keys require a
passphraseto be set in the source's credentials.- Unencrypted: You can generate an unencrypted private key by using the
-nocryptoption when running the key generation command. With this option, the passphrase field in the source's credentials is not required.Sifflet supports both encrypted and unencrypted private keys.
-- Set variable values
set user_name = 'USER_CHANGE_ME'; -- VALUE TO REPLACE, make sure this user is not already created
set user_public_key = 'MIIBIjANBgkqh...'; -- VALUE TO REPLACE, set to the public key you generated

-- Create a Sifflet service user
create user if not exists identifier($user_name)
rsa_public_key = $user_public_key
type = service
default_role = $role_name
default_warehouse = $warehouse_name;

-- Grant permissions to the Sifflet user
grant role identifier($role_name) to user identifier($user_name);
Username/password (deprecated)
Username/password authentication is deprecatedSnowflake enforces MFA (multi-factor authentication) on all new users since October 2024. All existing Snowflake users will be subject to this requirement by October 2025.
Username/password authentication is not compatible with this MFA requirement, and thus should no longer be used.
Use key pair authentication instead (see next section).
-- Set variable values
set user_name = 'USER_CHANGE_ME'; -- VALUE TO REPLACE, make sure this user is not already created
set user_password = 'password_change_me'; -- VALUE TO REPLACE

-- Create a Sifflet user
create user if not exists identifier($user_name)
password = $user_password
default_role = $role_name
default_warehouse = $warehouse_name;

-- Grant permissions to the Sifflet user
grant role identifier($role_name) to user identifier($user_name);
OAuth2 authentication
As of this writing, Sifflet only supports Snowflake external OAuth2 with Microsoft Entra ID as the identity provider and authorization server.
To use this authentication method, you first need to have configured two Enterprise Applications within Microsoft Entra ID:
- One application that represents the Snowflake resources you want to monitor with Sifflet
- One application that represents Sifflet (as an OAuth2 client). Sifflet authenticates as itself, not on behalf of a user. The application registration must be allowed to access the Snowflake resources, using the role you created in step 1.
This configuration step depends on your organization and security requirements and is out-of-scope for the Sifflet documentation. Use the Snowflake documentation linked above as a reference.
Gather from your administrator the following information:
From the application registration representing the Sifflet client:
- The OAuth2 client ID assigned to Sifflet. This is a UUID and looks like
b772183e-bfd1-46cc-9cca-0e09f51123eb. - The OAuth2 client secret assigned to Sifflet. This is a random character string.
- The OAuth2 authority. This is a URL that looks similar to this one:
https://login.microsoftonline.com/7fb993a4-5a09-4714-9f5a-4ebae8d72757. In the Azure portal, you can find it under the "Endpoints" button in the app registration page. - The OAuth2 token scope. This is a URI that looks similar to this one:
api://siffletdata.com/snowflake/aa1acf44-1a99-4b68-97cb-d1753a8baae0/.default. The.defaultscope is required since Sifflet uses the permissions granted to the OAuth client, not the permissions of a user.
You will provide this information to Sifflet in a later step.
From the application registration representing the Snowflake resources:
- The OAuth issuer.
- The JWS keys URL.
- The audience list
Your Snowflake administrator should have configured a security integration using this information. The query used to create the security integration would look like:
create security integration external_oauth_azure_sifflet
    type = external_oauth
    enabled = true
    external_oauth_type = azure
    external_oauth_issuer = 'https://sts.windows.net/7fb993a4-5a09-4714-9f5a-4ebae8d72757//'
    external_oauth_jws_keys_url = 'https://login.microsoftonline.com/7fb993a4-5a09-4714-9f5a-4ebae8d72757/discovery/v2.0/keys'
    external_oauth_token_user_mapping_claim = 'appid'
    external_oauth_snowflake_user_mapping_attribute = 'login_name'
    external_oauth_audience_list = ('api://siffletdata.com/snowflake/aa1acf44-1a99-4b68-97cb-d1753a8baae0')
    external_oauth_any_role_mode = 'ENABLE';
Finally, create the Sifflet user:
-- Set variables
set user_name = 'USER_CHANGE_ME'; -- VALUE TO REPLACE, make sure this user is not already created
set login_name = 'b772183e-bfd1-46cc-9cca-0e09f51123eb' -- VALUE TO REPLACE, set this to the Entra ID application ID representing the Sifflet client

create user $user_name;
type = 'service'
login_name = $login_name
default_role = $role_name;

grant role $role_name to user $user_name;
3. Grant privileges to databases to be discovered and monitored
Run the following SQL queries for every schema you want to see in Sifflet:
-- Read-only access to specific schemas
set database_name = 'DATABASE_CHANGE_ME'; -- VALUE TO REPLACE, database you want monitored
set schema_name = 'DATABASE_NAME.SCHEMA_NAME'; -- VALUE TO REPLACE

grant USAGE on database identifier($database_name) to role identifier($role_name);
grant USAGE on schema identifier($schema_name) to role identifier($role_name);
grant SELECT on all tables in schema identifier($schema_name) to role identifier($role_name);
grant SELECT on future tables in schema identifier($schema_name) to role identifier($role_name);
grant SELECT on all external tables in schema identifier($schema_name) to role identifier($role_name);
grant SELECT on future external tables in schema identifier($schema_name) to role identifier($role_name);
grant SELECT on all views in schema identifier($schema_name) to role identifier($role_name);
grant SELECT on future views in schema identifier($schema_name) to role identifier($role_name);
grant SELECT on all streams in schema identifier($schema_name) to role identifier($role_name);
grant SELECT on future streams in schema identifier($schema_name) to role identifier($role_name);
grant SELECT on all dynamic tables in schema identifier($schema_name) to role identifier($role_name);
grant SELECT on future dynamic tables in schema identifier($schema_name) to role identifier($role_name);
grant VIEW LINEAGE on account to role identifier($role_name);
4. Create the Snowflake source in Sifflet
Create a new credential
To create the Snowflake credential, follow the below steps:
-
Navigate to the "Credentials" page (you can find it in the side panel by selecting "Integrations" and then "Credentials") and then click on "New credential".
-
In the "Credential" area, enter the credentials corresponding to the Sifflet-specific user created above:
- For password-based authentication: Copy-paste the text below and replace it with the username and password defined in step 2:
{ "user": "<username>", "password": "<password>" }- For key-pair authentication with unencrypted private key: Copy-paste the text below and replace it with the correct username and unencrypted private key defined in step 2:
{ "user": "<username>", "private_key": "<private_key>" }- For key-pair authentication with encrypted private key: Copy-paste the text below and replace it with the correct username, encrypted private key, and the private key's passphrase defined in step 2:
{
  "user": "<username>",
  "private_key": "<private_key>",
  "private_key_passphrase": "<passphrase>"
}
- For OAuth2 authentication: Copy-paste the text below and replace it with the information gathered in step 2. The
oauth_providerfield must be set to "Microsoft Entra ID":
{
  "oauth_provider": "Microsoft Entra ID",
  "client_id": "<client_id>",
  "client_secret": "<client_secret>",
  "authority": "<authority_url>",
  "scopes": ["<oauth_token_scope>"]
}
Create a new source
To connect to Snowflake on Sifflet, you will need two items:
- The connection details: your Account Identifier, the Warehouse name, your Database name, and Schema.
- the credential: corresponds to the username and password/key you previously created.
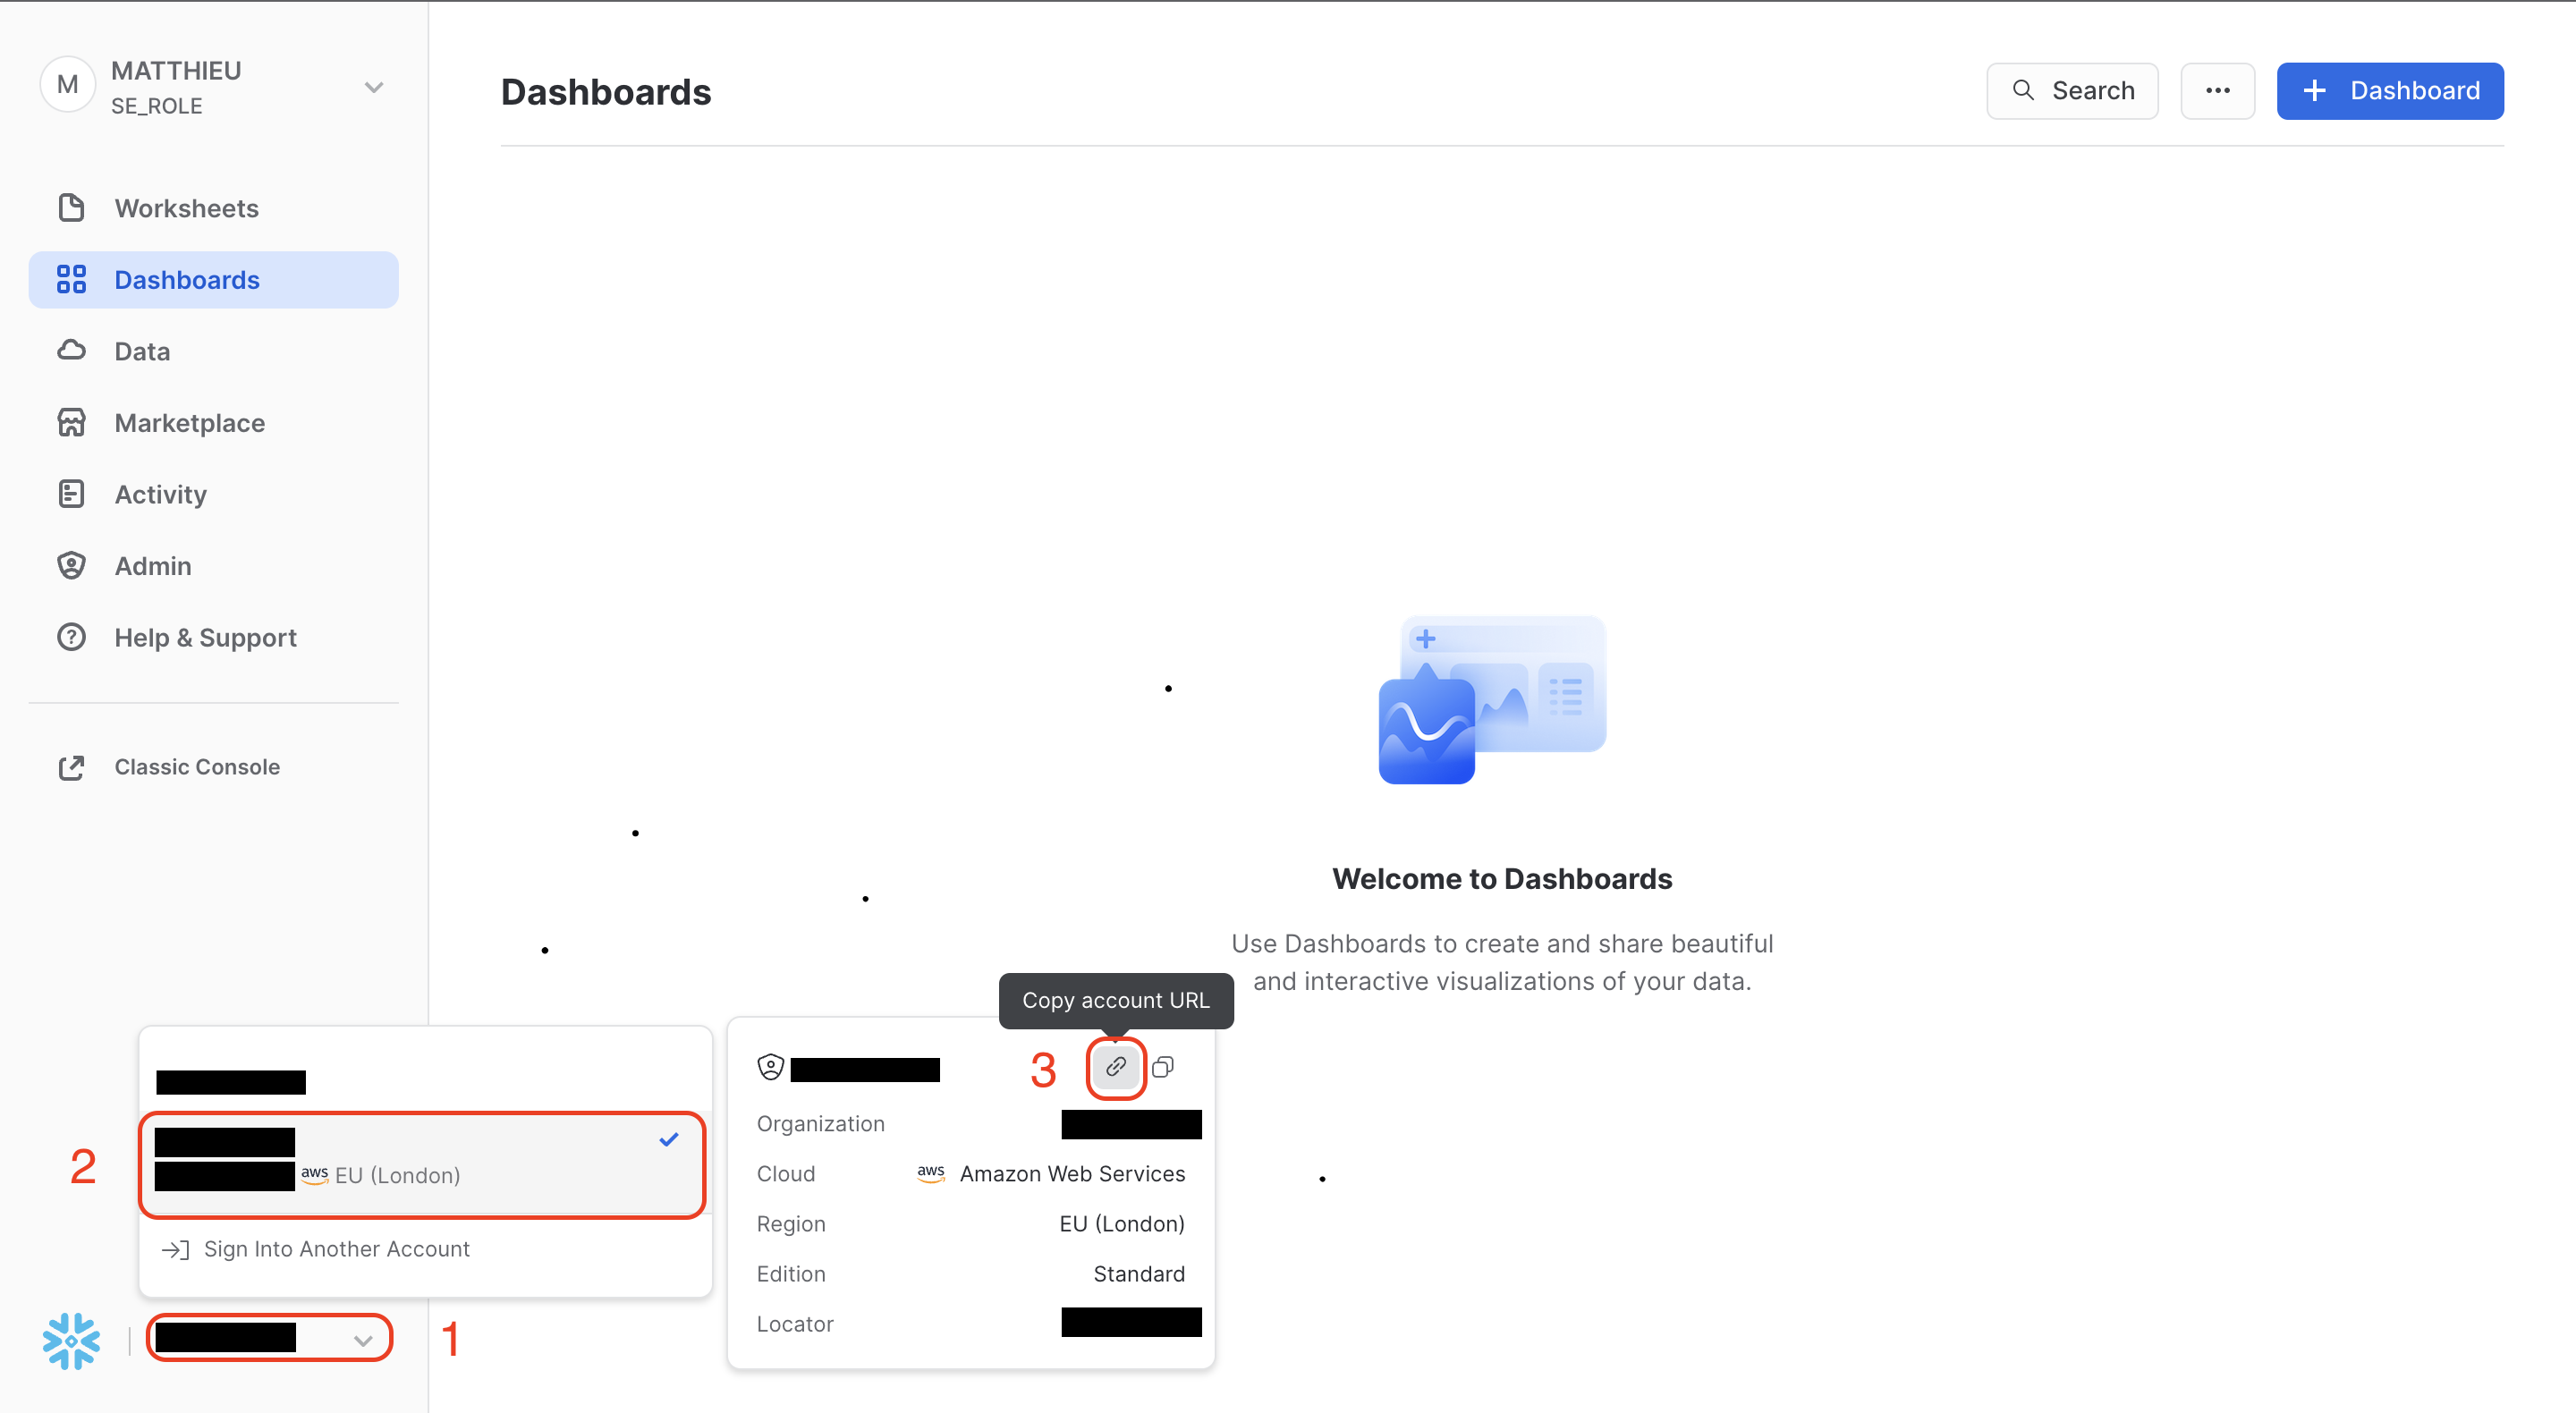
Retrieving the Snowflake account identifierTo retrieve your account identifier:
- Click on the arrow at the bottom left corner of the screen.
- Hover over the middle part of the widget.
- Click on the link icon.
This will copy your Snowflake console URL to your clipboard.
The Account Identifier is the string that precedes "snowflakecomputing.com" in your Snowflake console URL.
For instance:
- For "https://abcd123.eu-west-2.snowflakecomputing.com", your Account Identifier will be "abcd123.eu-west-2".
- For "https://acme-marketing_test_account.snowflakecomputing.com", your Account Identifier will be "acme-marketing_test_account".
- For https://app.snowflake.com/eu-west-2.aws/abcd123, your Account Identifier will be "abcd123.eu-west-2".
Several account identifiers for one Snowflake instanceThere might be several ways to access your Snowflake environment (more details on Snowflake's docs). For instance:
https://<orgname>-<account_name>.snowflakecomputing.comandhttps://<accountlocator>.<region>.<cloud>.snowflakecomputing.com.If you used one specific URL when connecting other tools - such as a BI tool - to your Snowflake instance, please use the same one when adding the Snowflake source in Sifflet.
By default, Sifflet refreshes Snowflake metadata once per day. However you can use the frequency parameter to pick a different refresh schedule if required.
You can refer to this page for details on adding a source in Sifflet.
Updated 5 months ago