Looker
You can integrate with Looker to map the dependencies between Looker objects and data pipelines.
The search engine has been upgraded accordingly to include all Looker dashboards in the search.

To connect Sifflet to Looker, you will need a Looker account with admin rights to create a read-only access.
The main steps are the following:
- Looker API Key: Generating an API Key for Sifflet's read-only access to Looker's API and add this key in Sifflet
- Connect Sifflet to your LookML Repository (with an access token or an SSH key)
1- Generate a Looker API Key
Before generating the API Key, you will need to create a dedicated role with permissions and create a dedicated user with this role.
a. Create a read-only permission set and a dedicated role
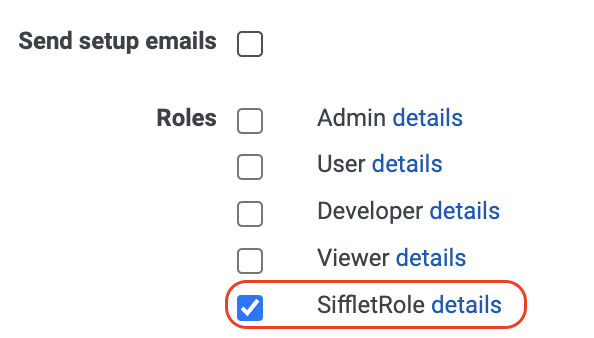
- In "Admin" -> "Roles", create a "New Permission Set" (for instance "SiffletRole").
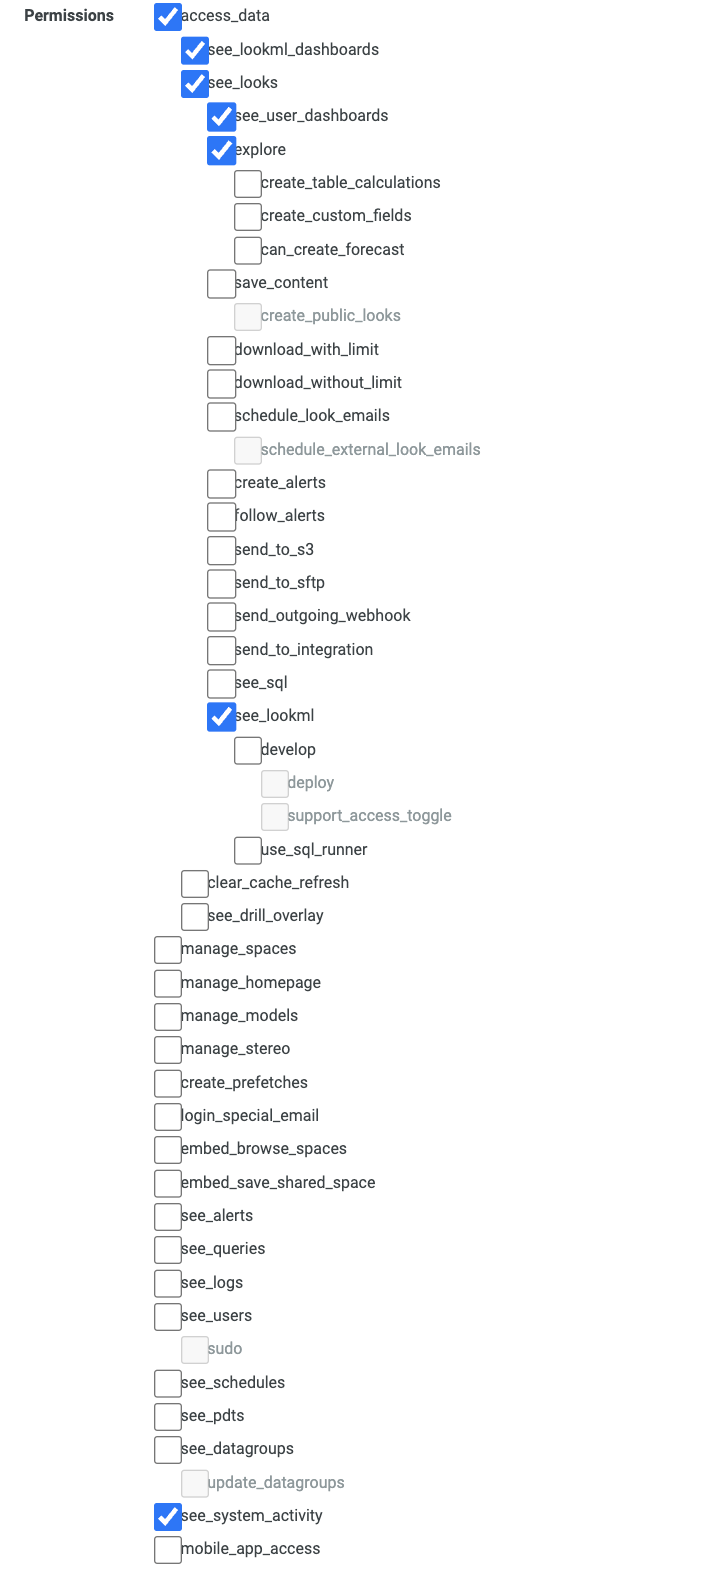
The list of permissions needed is:access_data access_data.see_lookml_dashboards access_data.see_looks access_data.see_looks.see_user_dashboards access_data.see_looks.explore access_data.see_looks.see_lookml see_system_activity
- In "Admin" -> "Roles", create a "New Role". Select the newly created Permission Set

b. Create the user with this read-only role
-
In "Admin" -> "Users" -> "Add Users" to create a dedicated Sifflet user. Select the Role you created previously.
The email doesn't need to be valid. You can choose an internal email for book keeping or a generic one such as
sifflet_user@<domain>.com
You can also uncheck the "Send setup emails" option.
c. Generate the API Key
You can now add the API Key to the Sifflet user:
- Once the Sifflet user is created, in "Admin" -> "Users", select "Edit" next to the newly created user
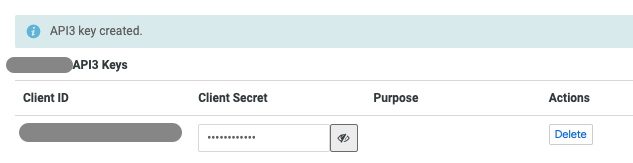
- In "API3 Keys", select "Edit Keys" then "New API3 Key"
This will generate a "Client ID" and a "Client Secret" that you will need to add in Sifflet.
d. Add Looker datasource in Sifflet
- Create the Looker secret that Sifflet will use to connect:
- In Sifflet, on the left panel, choose "Integration" and then the submenu "Secrets"
- Press "New" Secret
- Information required:
- Name of the secret
- The secret format is the following:
{"user":"ClientÌD","password":"ClientSecret"}- Add the Looker data source:
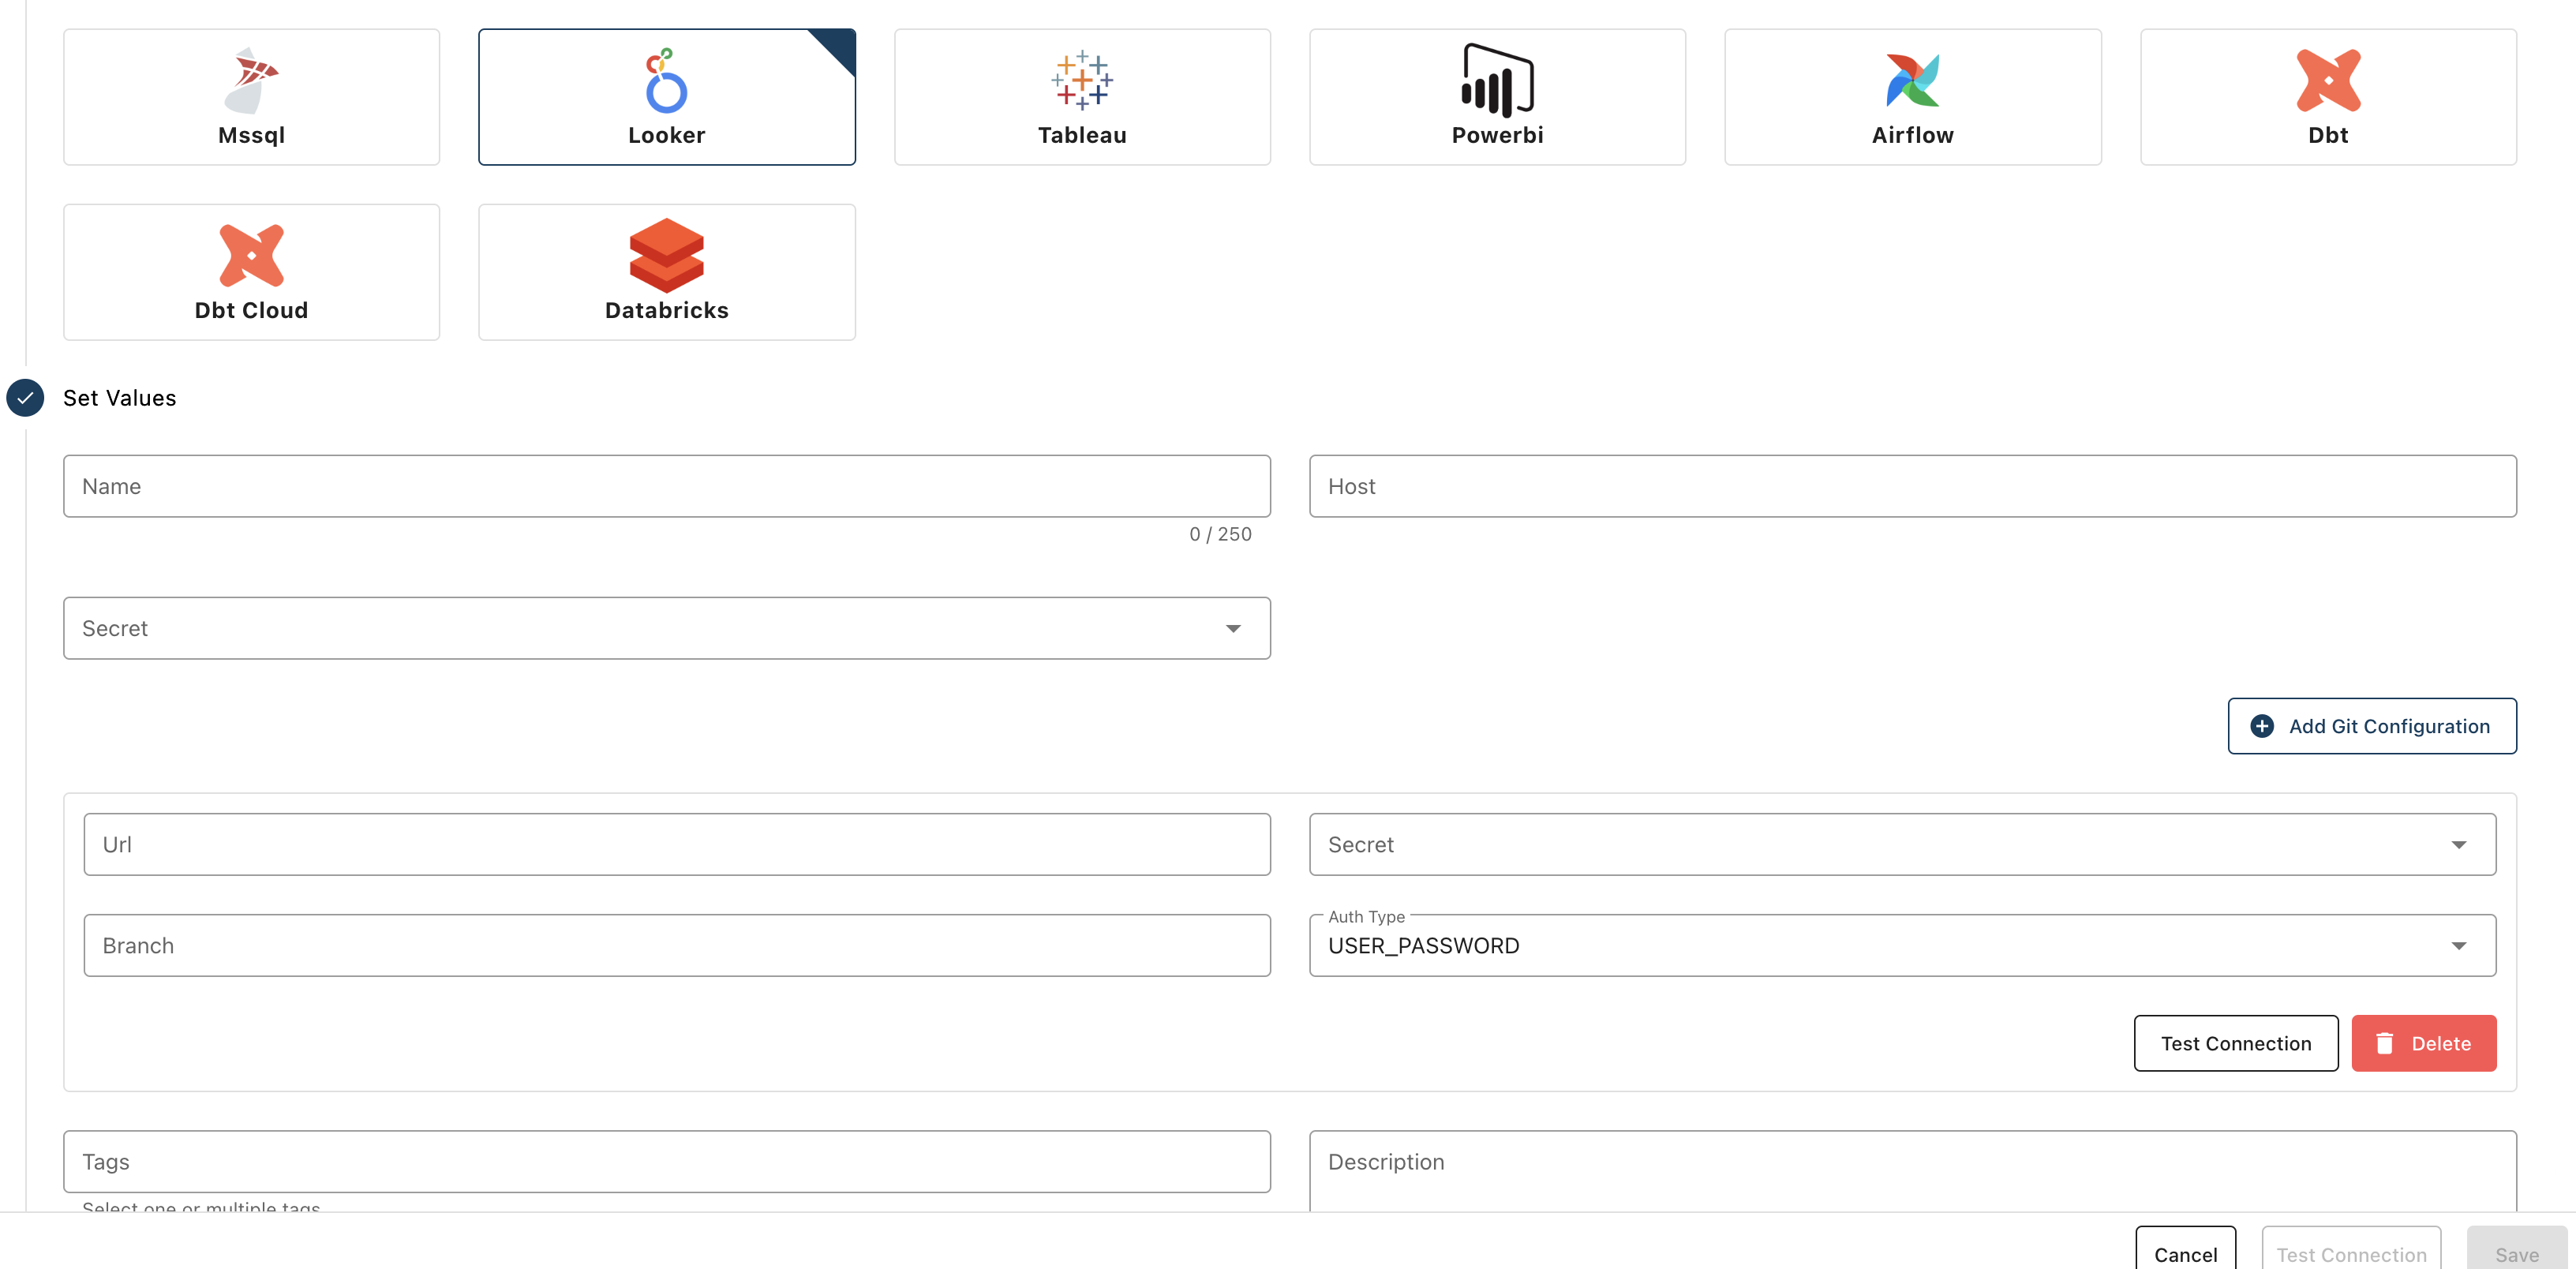
- On the left panel, choose "Integration" and then the "Sources" submenu
- Press "New" Datasource
- Information required:
- Name of the data source
- Type: "Looker"
Host: URL of the Looker site and append at the end the following "/api/4.0".
For instance if you usually connect to Looker on "https://abcdef.cloud.looker.com/
", then you should add the following on host: "https://abcdef.cloud.looker.com/api/4.0"Secret: choose the newly created secret- The rest of the fields are optional, they are used for the SSH connection to your LookML repository (see here)
If any port issue arises when connecting, you may have to add ":443/api/4.0" or ":19999/api/4.0" instead.
It depends on the date of creation before or after 07/07/2020 (see Looker API doc), the most recent being 443.
2- Connect Sifflet to your LookML Repository with an access token or an SSH key
You can grant access to your LookML Repositories with a read-only token or SSH Key.
Several repositories for one Looker connectionYou can add several repositories to your Looker datasource if needed
Connect with an access token
a. Generate an access token
You can follow the official documentation here: Gitlab, Github, Bitbucket.
The token only needs read access:
| Access Rights Scope | |
|---|---|
| Github | Github personal access tokens with permissions: repoOR Github personal fine-grained personal access:
|
| Gitlab | read_repository. If using a project or group access token, you'll need at least the Reporter role. |
| Bitbucket | Project Read |
b. Configure Sifflet with the token
-
Create the secret that will contain the private key that Sifflet will use to connect.
-
In Sifflet, on the left panel, choose "Integration" and then the "Secrets" submenu
-
Press "New" Secret
-
Information required:
-
Name of the secret
-
The secret format is the following:
- For Github:
{"user": "<user_for_the_token", "password":"<token>"}
For<user_for_the_token>you can choose the user associated to the token or any string of character, as long as you do not leave empty - For Gitlab:
{"password":"<token>"} - For Bitbucket:
Bearer <token>
- For Github:
-
-
-
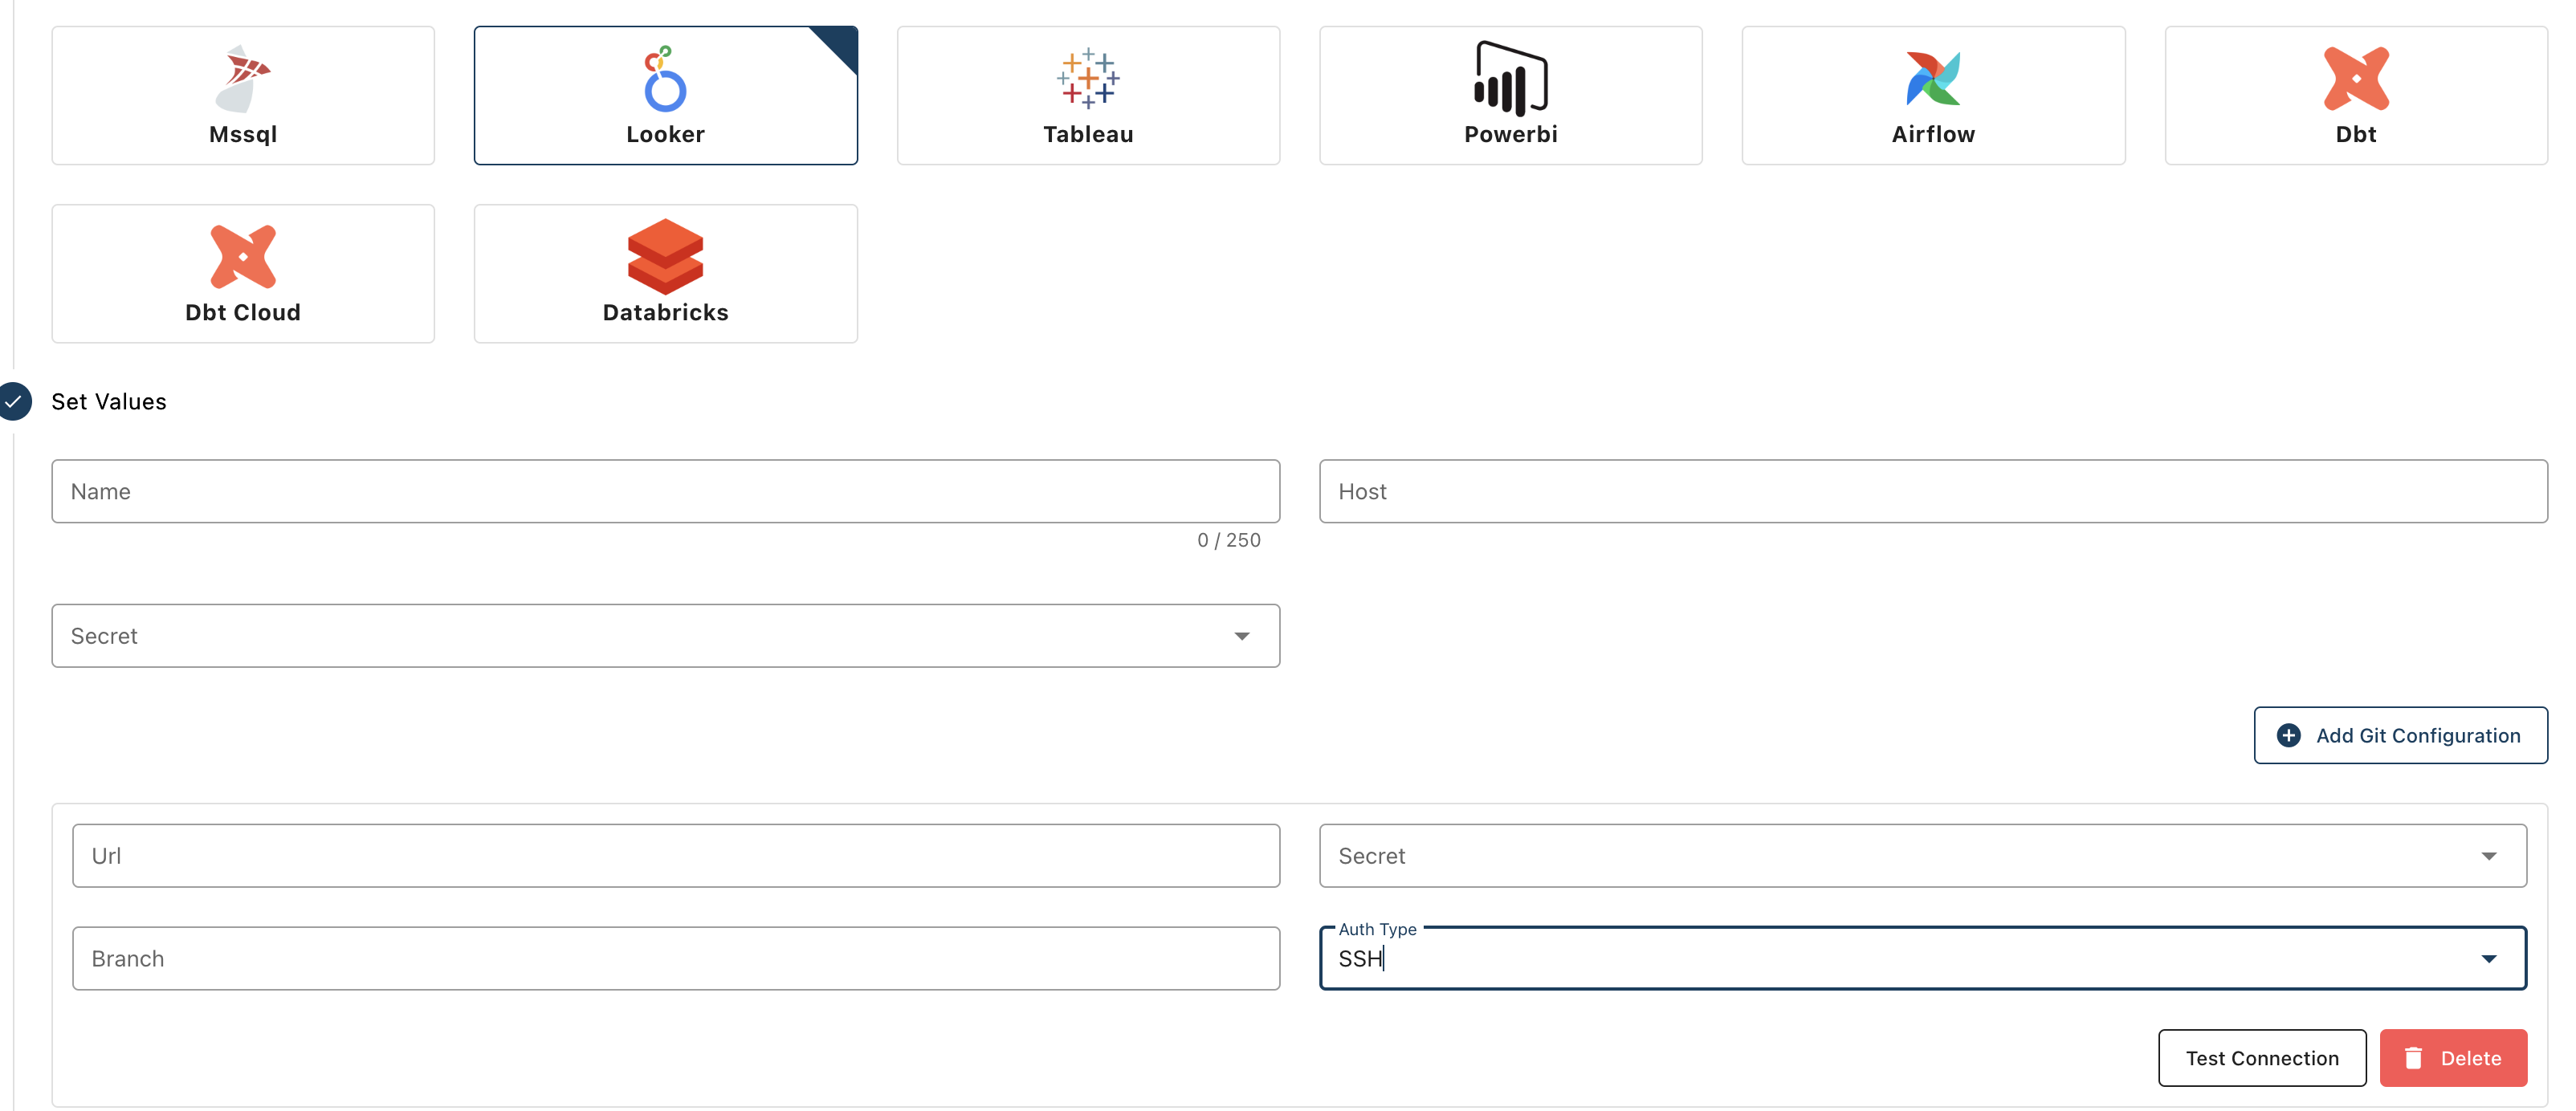
Edit the Looker data source you created in part 1 to finalise the connection to your LookML repository:
- On the left panel, choose "Integration" and then the "Sources" submenu, choose your datasource and then press "Edit"
- Click on
Add Git Configuration
- Information required:
URL: the URL of your repo. It should have the following formathttps://###.gitSecret: the secret you just createdBranch(optional): the default branch if left empty. You can also specify the branch you want Sifflet to sync withAuth Type:- use
USER_PASSWORDif connecting with Github/Gitlab - use
HTTP_AUTHORIZATION_HEADERif connecting with Bitbucket
Once all information are filled, you can test your token connection with theTest Connectionbutton
- use
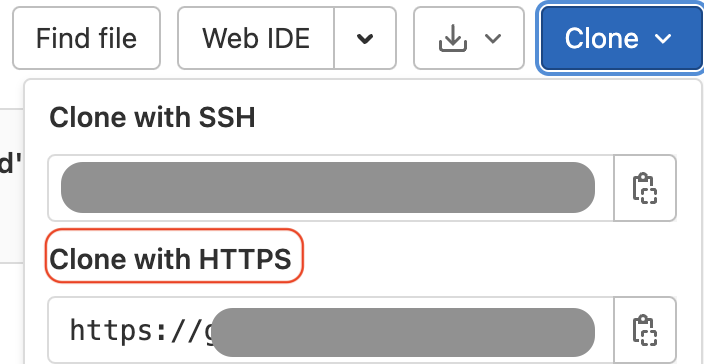
Where to find your URL for Gitlab for token
Or connect with an SSH key
Another alternative to connect Sifflet to your LookML repository is to generate an SSH key.
The main steps are the following:
a. Generate an SSH Key
b. Configure your repo (Gitlab, Bitbucket, etc.) with the public key
c. Configure Sifflet with the private key
a. Generate an SSH key
- You can generate one in your local machine by running on your terminal the following command:
- For Github:
ssh-keygen -t ecdsa -m pem -b 521 -C [email protected] - For Gitlab/Bitbucket:
ssh-keygen -t rsa -m pem -b 4096 -C [email protected]
The email doesn't need to be an existing one, although it is recommended to use your own for tracing purposes.
- For Github:
- You will then have to input the information required on the terminal prompt:
- File location: no condition
- Passphrase: please leave it empty
The prompt will be similar to the below prompt:
sifflet % ssh-keygen -t rsa -m pem -b 4096 -C [email protected]
Generating public/private rsa key pair.
Enter file in which to save the key: : <name_of_key>
Enter passphrase (empty for no passphrase):
Enter same passphrase again:
Your identification has been saved in <name_of_key>
Your public key has been saved in <name_of_key>.pub
The key fingerprint is:
SHA256:nt.... [email protected]
The key`s randomart image is:
+---[RSA 4096]----+
#################
+----[SHA256]-----+- The pair of private/public keys will be created in your current directory:
<name_of_key>and<name_of_key>.pub
b. Configure your repo
With the public key newly generated (<name_of_key>.pub), you can set up the SSH connection. The associated account should have read access rights.
You can follow the official documentation here: Gitlab, Github, Bitbucket.
c. Configure Sifflet
-
Create the secret that will contain the private key that Sifflet will use to connect.
-
In Sifflet, on the left panel, choose "Integration" and then the "Secrets" submenu
-
Press "New" Secret
-
Information required:
-
Name of the secret
-
The secret format is the following: the exact content of your private key
<name_of_key>previously created.For Github:
-----BEGIN EC PRIVATE KEY-----
########################
-----END EC PRIVATE KEY-----
For Gitlab/Bitbucket:
-----BEGIN RSA PRIVATE KEY-----
########################
-----END RSA PRIVATE KEY-----
-
-
-
Edit the Looker data source you created in part 1 to finalise the connection to your LookML repository:
- On the left panel, choose "Integration" and then the "Sources" submenu, choose your datasource and then press "Edit"
- Click on
Add Git Configuration
- Information required:
URL: the URL of your repo. It should have the following formatgit@####.git. Please choose the SSH option. For instance, for Gitlab, you should see the belowSecret: the secret you just createdBranch(optional): the default branch if left empty. You can also specify the branch you want Sifflet to sync withAuth Type: useSSH
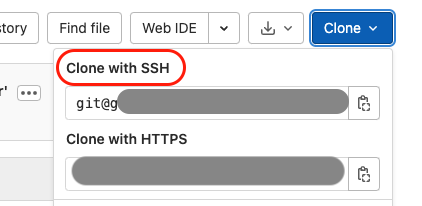
Where to find your URL on Gitlab for SSH
Sifflet Insights Browser Extension
Sifflet Insights browser extension supports the following Looker asset types:
- Dashboards
FAQ
I cannot find some of my Looker objects on the catalog/lineage
If you cannot find some Looker objects in Sifflet's Catalog and in the lineage this could be due to restricted access on some folders. Please make sure to give Sifflet userview access level to all projects you want to be catalogued and part of the lineage. For more information, you can follow the official Looker documentation.
Updated 8 months ago