Databricks
Why connect Sifflet to Databricks?
By connecting Sifflet to Databricks, you'll be able to leverage Sifflet's three core capabilities:
- Catalog all your data assets (with valuable metadata retrieved from Databricks and enriched directly in Sifflet).
- Run monitors on your data assets to detect issues as soon as they arise and allow data consumers to trust the data.
- Benefit from Sifflet's end-to-end lineage that showcases your data pipelines and the assets upstream and downstream of your data platform.
Integration guide
Ensure you're an admin in DatabricksTo perform the required operations to integrate Sifflet with Databricks, you must use a Databricks user with admin permissions.
You can integrate Sifflet with Databricks by following these steps:
- Create a dedicated Service Principal with its token or use a Personal Access Token
- Grant Sifflet the required permissions
- Create the Databricks source in Sifflet
Environments without Unity Catalog and Databricks SQLCurrently, Sifflet only supports Databricks environments with Unity Catalog and Databricks SQL. For other configurations, don't hesitate to reach out to us.
1. Create a Service Principal or a Personal Access Token
A service principal is a dedicated identity created for automated tools like Sifflet. In accordance with the Databricks documentation, we recommend using a service principal instead of a Personal Access Token belonging to a Databricks user.
Option 1: Service Principal (recommended)
Using a service principal tokenIf you opt for a Service Principal, Sifflet only supports using a personal access token for the service principal (which can only be generated via Databricks CLI) and not OAuth Machine-to-Machine (available via the UI).
- Create a service principal using one of the below options:
- In the
Configurationstab of the newly created service principal, enable theDatabricks SQL accessentitlement (the only required entitlement). - Grant the usage of personal access tokens to this service principal (more information here):
- Follow this path:
Workspace admin->Advanced->Personal Access Tokens->Permission Settings. - Add the
Can Usepermission to the service principal previously created.
- Follow this path:
- Generate a personal access token for the service principal (requires the use of Databricks CLI):
- For a step-by-step description please follow the "Databricks personal access tokens for service principals" from the official documentation.
- Save the token as you will need it to connect Databricks to Sifflet.
Option 2: User Personal Access Token
To create a user personal access token, please follow the section "Databricks personal access tokens for workspace users" from the official documentation.
Save the token as you will need it to connect Databricks to Sifflet.
2. Grant Sifflet the required permissions
2.1 Grant Sifflet Access to Data Tables
You can grant permissions to the service principal at the Catalog, Schema or Table level.
Grant access permissions to existing and future tables
- Granting permissions at Catalog level will automatically propagate the permissions to existing and future schemas and tables.
- Granting permissions at Schema level will automatically propagate the permissions to existing and future tables.
Option 1: Grant permissions using the Databricks console
In the left menu select Catalog
Granting permissions at the Catalog level
- Navigate to the Catalog you want to add to Sifflet
- Navigate to the
Permissionstab - Click on
Grant - Search the service principal/user in the
Principalsbox - Select the
Data Readerprivilege preset
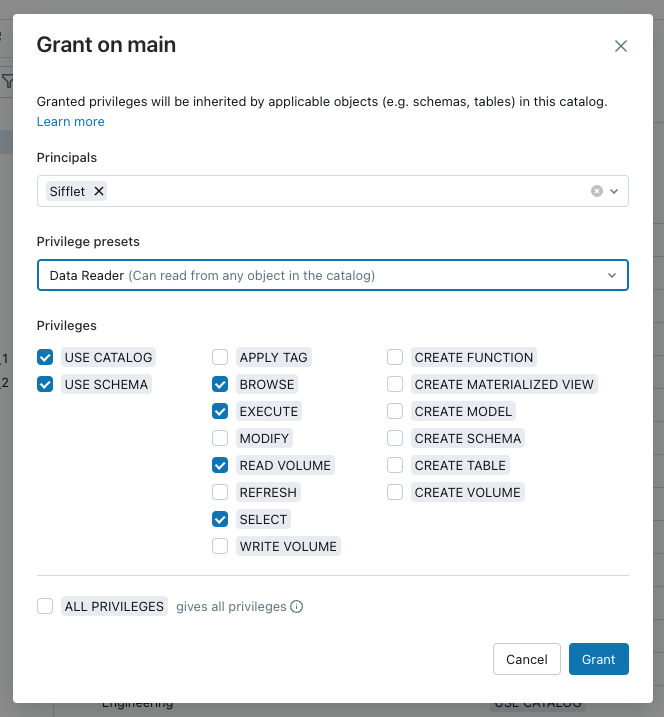
The privileges required by Sifflet
Granting permissions at Schema level
Granting the USE CATALOG privilege
USE CATALOG privilegeYou need to grant the service principal/user the USE CATALOG privilege on the parent catalog to perform any actions in the target schema:
- Navigate to the Catalog you want to add to Sifflet
- Navigate to the
Permissionstab - Click on
Grant - Search the service principal/user in the
Principalsbox - Select
USE CATALOG
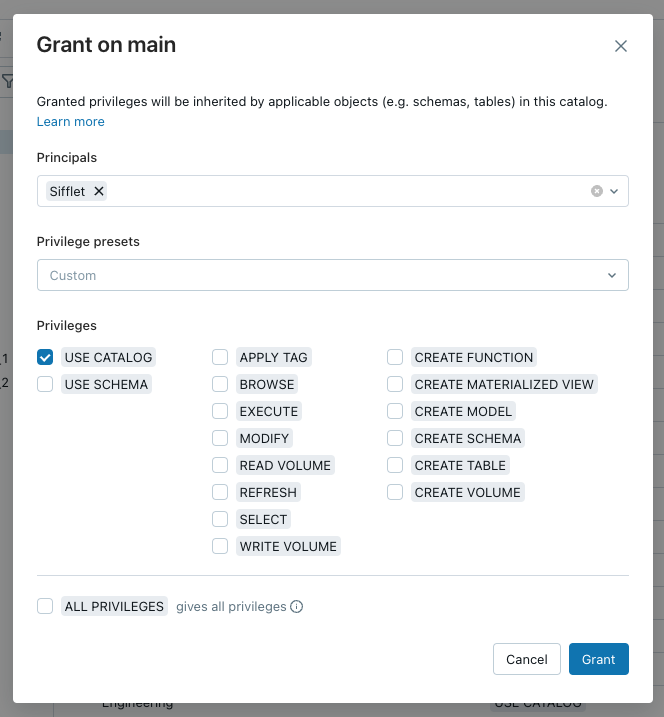
Granting Sifflet the USE CATALOG privilege
Granting the Schema level permissions
- Navigate to the Schema you want to add to Sifflet
- Navigate to the
Permissionstab - Click on
Grant - Search the service principal/user in the
Principalsbox - Select the
Data Readerprivilege preset
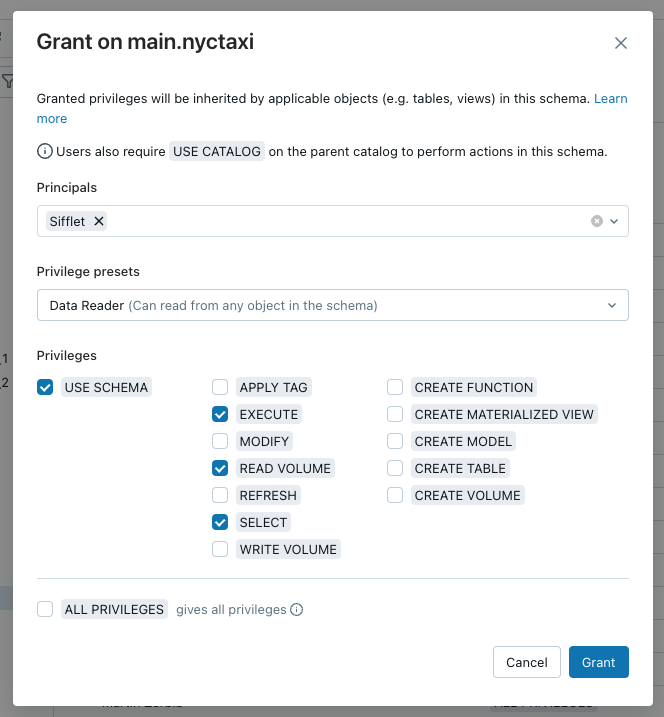
The privileges required by Sifflet
Option 2: Grant permissions by running SQL queries
- For the service principal, you will need the service principal
Application IDthat can be found inAdmin Console->Service principalstab. - For the user's personal access token, you can replace the
Application IDwith the user name.
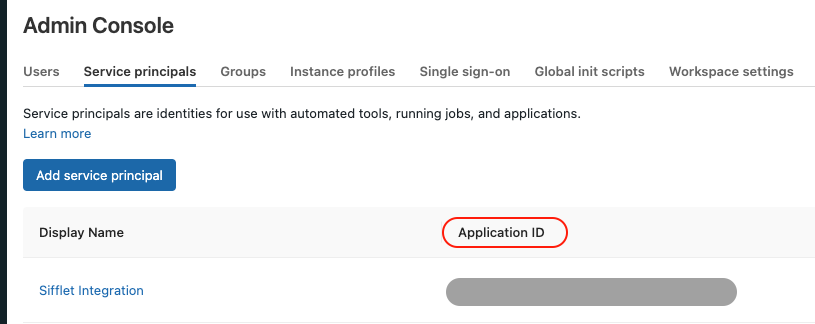
Finding the Application ID for the service principal
Granting permissions at Catalog level
Granting permissions at Catalog level:
GRANT USE_CATALOG ON CATALOG <catalog_name> TO `<Application_ID>`;
GRANT USE_SCHEMA ON CATALOG <catalog_name> TO `<Application_ID>`;
GRANT SELECT ON CATALOG <catalog_name> TO `<Application_ID>`;
Granting permissions at Schema level
Granting permissions at Schema level:
GRANT USE_CATALOG ON CATALOG <catalog_name> TO `<Application_ID>`;
GRANT USE_SCHEMA ON SCHEMA <catalog_name>.<schema_name> TO `<Application_ID>`;
GRANT SELECT ON SCHEMA <catalog_name>.<schema_name> TO `<Application_ID>`;
Granting permissions at Table level
Granting permissions at Table level:
GRANT USE_CATALOG ON CATALOG <catalog_name> TO `<Application_ID>`;
GRANT USE_SCHEMA ON SCHEMA <schema_name> TO `<Application_ID>`;
GRANT SELECT ON TABLE <catalog_name>.<schema_name>.<table_name> TO `<Application_ID>`;
2.2 Grant Sifflet Access to System Tables
Certain Sifflet features, such as retrieving detailed lineage information and monitoring Databricks Workflows, rely on accessing Databricks System Tables. These tables reside within the system catalog and provide operational metadata about your Databricks account.
Sifflet requires access to the following system tables:
| System table name | Sifflet Usage |
|---|---|
| system.access.table_lineage | Table-level lineage |
| system.access.column_lineage | Column-level lineage |
| system.access.workspaces_latest | Filtering metadata about Databricks Workflows using workspace host |
| system.lakeflow.jobs | Metadata about Databricks Workflows (at the job level) |
| system.lakeflow.job_tasks | Metadata about Databricks Workflows (at the task level) |
| system.lakeflow.job_run_timeline | Metadata about Databricks Workflows runs (at the job level) |
| system.lakeflow.job_task_run_timeline | Metadata about Databricks Workflows runs (at the task level) |
| system.lakeflow.pipeline_update_timeline | Metadata about pipelines |
| system.query.history | Query history |
To enable these features, ensure the following prerequisites are met before completing the Sifflet source configuration:
-
Unity Catalog Enabled Workspace: Your target Databricks workspace must be enabled for Unity Catalog, as system tables are governed by it.
-
Enable Required System Schemas: System tables are organized into schemas within the
systemcatalog (e.g.,system.lakeflow,system.access). While thelakeflowschema is enabled by default,queryandaccessschemas (needed by Sifflet) must be explicitly enabled by a Databricks Account Admin.-
Use the Databricks CLI or SystemSchemas API to enable the necessary schemas. Consult the Databricks documentation on enabling system table schemas for detailed instructions.
System schemas required by SiffletSifflet requires access to the following system schemas:
system.access,system.lakeflow, andsystem.query. -
-
Grant Access to Sifflet: The service principal or user configured for Sifflet needs specific permissions on the
systemcatalog and its schemas. Grant these permissions using SQL commands or the Catalog Explorer:USE CATALOGon thesystemcatalog.USE SCHEMAon the required, enabled schemas within thesystemcatalog.SELECTprivilege on the specific tables within those schemas that Sifflet needs to query.
SQL Grant Statements:
(Replace<Application_ID>with the actual user or service principal Application ID used by Sifflet)-- Grant access to the system catalog GRANT USE CATALOG ON CATALOG system TO `<Application_ID>`; -- Grant access to the required system schemas GRANT USE SCHEMA ON SCHEMA system.access TO `<Application_ID>`; GRANT USE SCHEMA ON SCHEMA system.lakeflow TO `<Application_ID>`; GRANT USE SCHEMA ON SCHEMA system.query TO `<Application_ID>`; -- Grant SELECT on the required tables GRANT SELECT ON TABLE system.access.table_lineage TO `<Application_ID>`; GRANT SELECT ON TABLE system.access.column_lineage TO `<Application_ID>`; GRANT SELECT ON TABLE system.access.workspaces_latest TO `<Application_ID>`; GRANT SELECT ON TABLE system.lakeflow.jobs TO `<Application_ID>`; GRANT SELECT ON TABLE system.lakeflow.job_tasks TO `<Application_ID>`; GRANT SELECT ON TABLE system.lakeflow.job_run_timeline TO `<Application_ID>`; GRANT SELECT ON TABLE system.lakeflow.job_task_run_timeline TO `<Application_ID>`; GRANT SELECT ON TABLE system.lakeflow.pipeline_update_timeline TO `<Application_ID>`; GRANT SELECT ON TABLE system.query.history TO `<Application_ID>`;Refer to the Databricks documentation on managing Unity Catalog privileges for more details on granting permissions.
3. Create the Databricks source in Sifflet
Create a new credential
To create the Databricks credential, follow the below steps:
- Navigate to the "Credentials" page (you can find it in the side panel by selecting "Integrations" and then "Credentials") and then click on "New credential"
- Paste the previously generated token as-is
Create a new source
Picking a SQL Warehouse for SiffletYou can use an existing SQL warehouse or create a new one for Sifflet (recommended). If you want to create a new warehouse, you can follow the instructions detailed here.
You can choose the cluster size depending on the number of data assets you want to monitor. As a reference, X-Small is enough for environments with thousands of tables or fewer.
First, let's find the information that Sifflet requires to integrate with Databricks. In your Databricks environment:
- Go to
SQL Warehouse - Choose the warehouse that Sifflet will use
- Navigate to the
Connection Detailstab
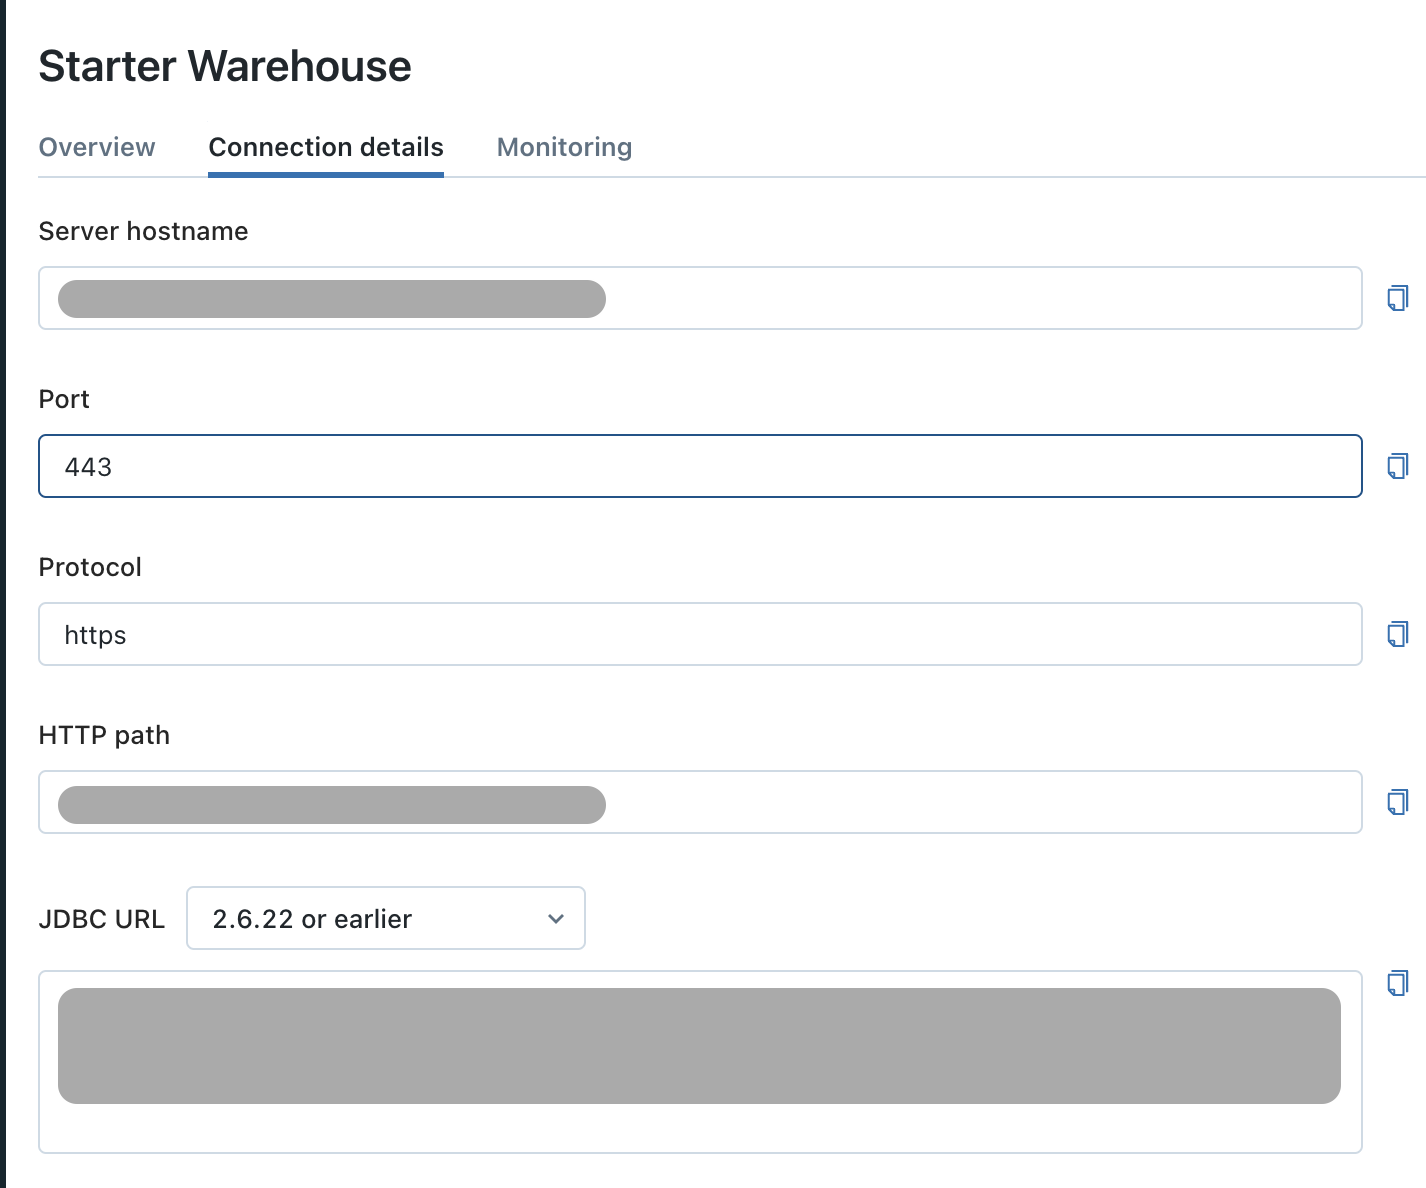
The connection details tab
Then, in Sifflet, you can follow the below steps:
- Go to the source creation page (detailed here)
- Fill out the necessary information that was collected in the previous step:
Name: The name that will be used to reference the source throughout SiffletHost: corresponds to theServer hostnamein Databricks, with the formatxxxxx.cloud.databricks.comPort: 443Http Path: corresponds to theHTTP pathin DatabricksCatalog: the Catalog you want to add to SiffletSchema: the Schema you want to add to SiffletCredential: the name of the secret created above (containing the token)
Source refresh frequencyBy default, Sifflet refreshes Databricks metadata once per day. However you can use the frequency parameter to pick a different refresh schedule if required.
You can refer to this page for more details on adding a source in Sifflet.
Next Steps: Monitor your Databricks Workflows
Now that you have successfully connected Sifflet to your Databricks environment, you can enhance your data observability by also adding the Databricks Workflows integration.
This powerful addition allows Sifflet to automatically discover your jobs and workflows, providing you with:
- End-to-end lineage that includes the jobs that create or update your tables.
- A comprehensive catalog of your Databricks job assets.
- Faster root cause analysis for data incidents, as Sifflet's AI can pinpoint issues originating from your data pipelines.
To get started, please see our Databricks Workflows integration guide.
Updated 4 months ago