Monitors as Code
Overview
Monitors as Code allows data engineers to create and maintain monitors programmatically as part of their CI/CD processes.
Prerequisites
Users need to install Sifflet CLI and configure the CLI using the API token generated on the platform.
Workspace and Monitors
A workspace is a collection of isolated objects. Creating monitors within a workspace allows users to manage a group of monitors within the same workspace with a single command, without interfering with other monitors belonging to different workspaces.
One of the benefits of using workspaces is preventing configuration conflicts, especially when multiple teams manage the monitors' settings.
Monitors in workspaceOnce a monitor is created in a workspace, it becomes read-only on the User Interface (UI). Modifications or deletions are exclusively through Monitors as Code.
Example - Step-by-step guide
- Install and configure Sifflet CLI (version >= 0.3.6) - see Sifflet CLI - Command Line Interface
- Install sifflet CLI:
pip install siffletor upgrade it to a version >= 0.3.6:pip install sifflet --upgrade - Create an access token with Editor (or Admin) role
- Configure the CLI:
sifflet configure --tenant {yourTenant}and paste the access token when needed - Verify that CLI is configured correctly:
sifflet status
- Install sifflet CLI:
- Change the current directory of your command line to a new directory that will contain your workspace and monitor files
- Create and deploy your first workspace
- Create the workspace:
sifflet code workspace init --file workspace.yaml --name "My First workspace" - A new
workspace.yamlfile has been generated in the current folder. The file content will look like:See Workspace schema for more details about the format of this filekind: Workspace version: 1 id: ca33195d-28c7-4bba-8293-8539a6bea86b name: My First workspace include: - '*.yaml' exclude: [] - Deploy the workspace:
sifflet code workspace apply --file workspace.yaml
- Create the workspace:
- Add your first monitor to the workspace
- Create a new monitor:
sifflet code monitor init --file myFirstMonitor.yaml --name "My first workspace-managed monitor" - A new
myFirstMonitor.yamlfile has been generated in the current folder. The file content will look like:See Monitor schema for more details about the format of this filekind: Monitor version: 2 id: e75009a8-0199-453e-a3d4-3b56e760b09f name: My first workspace-managed monitor incident: severity: Low datasets: - name: {Name of a dataset} parameters: kind: MonitorKind - Replace
{MonitorKind}with the kind of monitor you want to create. For test purposes, you can try withSchemaChange. See Parameters list and example for every monitor type for details about what parameters to add to this section. - Replace
{Name of a dataset}by the name of a dataset you can find in the Sifflet data catalog. - Deploy the workspace:
sifflet code workspace apply --file workspace.yaml
- Create a new monitor:
- You should now see your new monitor in the Sifflet UI (you can search for My first workspace-managed monitor in the Monitors page)
- (Optional) Cleanup
- You can now clean up the data from this demo with:
sifflet code workspace delete --id {Workspace ID} - This will remove the workspace and all attached monitors.
- You can now clean up the data from this demo with:
Managing workspaces
Creating a workspace
- Start by initializing a workspace locally with
sifflet code workspace init --file {workspaceFileName}.yaml --name {workspaceName}. This will create a{workspaceFileName}.yamlfile locally - in particular, it will generate the workspace UUID. - Update the file
{workspaceFileName}.yamlwith the list of monitors you want to include in the workspace (see the following documentation section to learn more on how to set a monitor)
Applying a workspace
Finally, you can deploy the workspace with sifflet code workspace apply --file {workspaceFileName}.yaml.
Example:
sifflet code workspace apply --file myWorkspace.yaml --name "My first workspace"kind: Workspace
version: 1
id: 37114815-3d82-4d8a-93e6-4b2bf78afe84
name: My first workspace
description: |
This is a great workspace.
You can find the source at https://gitlab.com/...
include:
- "**/*.yaml" # Glob pattern
- ...
exclude:
- "dbt/**" # Glob pattern
- ...Deleting a workspace with the attached monitors
sifflet code workspace delete --id {workspaceId}
Delete all attached monitorsThis command will delete all monitors created via this workspace, with their associated data. This change cannot be undone.
Managing monitors
Creating a monitor via code
- Initialize a new monitor locally with
sifflet code monitor init --file {monitorFileName} --name {monitorName}. - Update the file with the parameters you need. (see Monitor schema):
- If necessary, update the workspace file
{workspaceFileName}.yamlto include the new monitor in theincludesection. - Then, deploy it using
sifflet code workspace apply --file {workspaceFileName}.yaml
Cloning from an existing monitor
- On the UI, go to the monitor details page of the monitor that will be copied
- Click on Show as YAML code
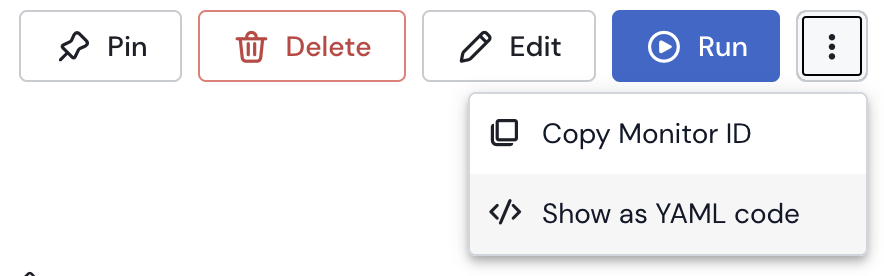
- Copy the YAML code
- Paste it in your favorite text/code editor
- Update the file with the required changes
At least, update the ID with a new UUID (currently, migrating UI-managed monitors to code-managed monitors is not supported). - Save the file
- If necessary, update the workspace file
{workspaceFileName}.yamlto include the new monitor in theincludesection. - Deploy using
sifflet code workspace apply --file {workspaceFileName}.yaml
Creating an As Code monitor leveraging the UI
-
In the UI, create a new monitor
-
Configure the monitor
-
Once ready, instead of Save, click on Show as YAML code
-
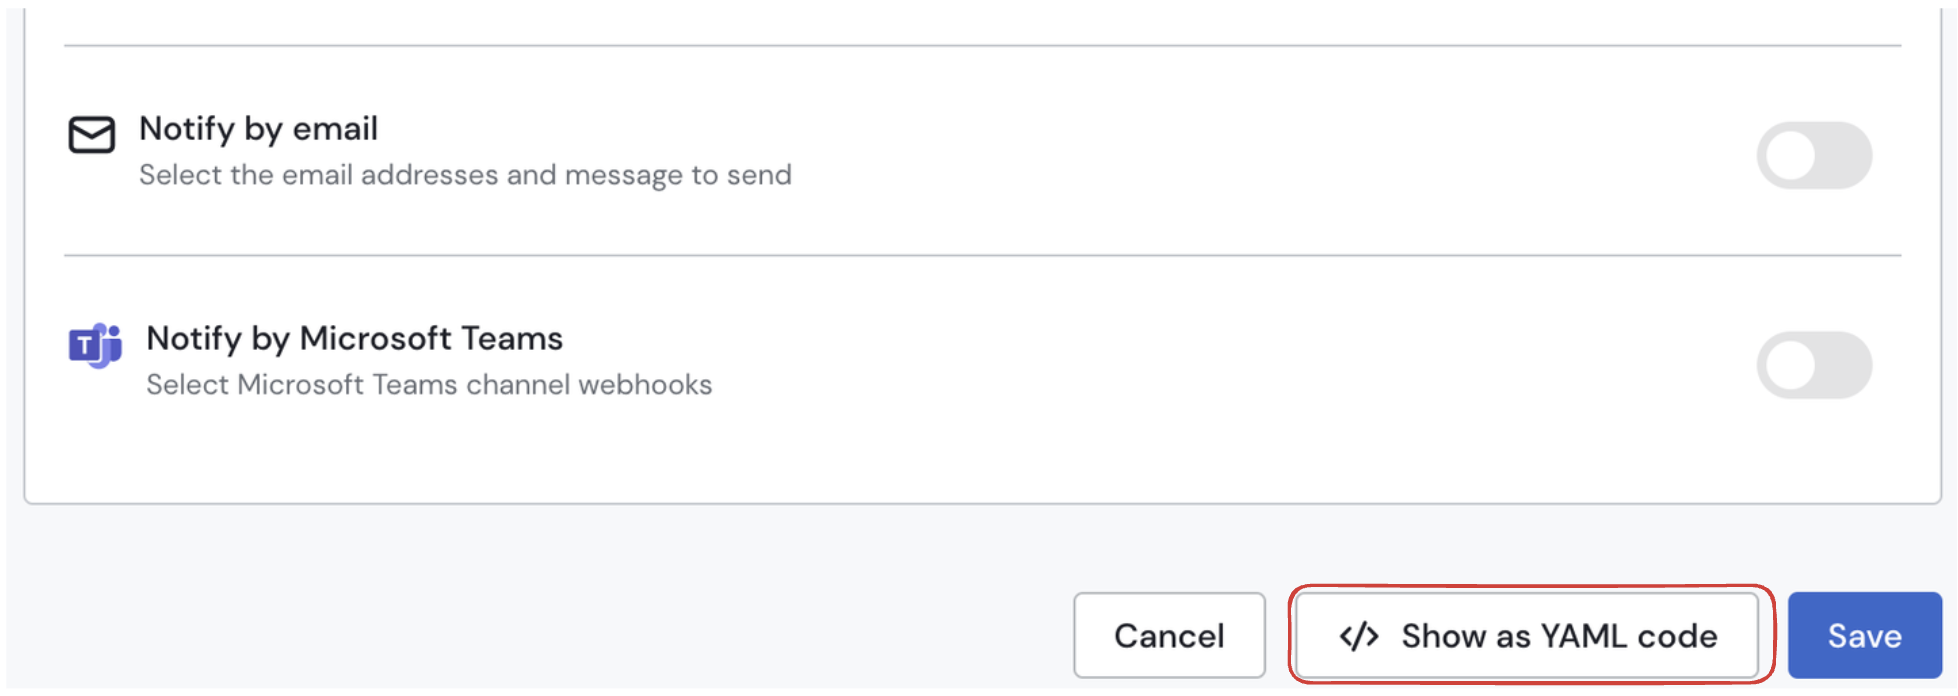
Copy the YAML code
-
Paste it in your favorite text/code editor
-
Update the file if needed
-
Save the file
-
If necessary, update the workspace file
{workspaceFileName}.yamlto include the new monitor in theincludesection. -
Then, deploy it using
sifflet code workspace apply --file {workspaceFileName}.yaml
Deleting a monitor
- Remove the YAML file corresponding to the monitor (the most reliable way is to find it by
id) - Then, deploy the workspace using
sifflet code workspace apply --file {workspaceFileName}.yaml(add--force-deleteif you are using version 0.22.0 or earlier)
Deleting a monitorBe cautious when using it as it will remove any monitors and all associated data (such as monitor runs and incidents) that cannot be found in the local workspace.
Also, note that a monitor is uniquely identified by its ID, so changing the
idwill cause the monitor attached to the old ID to be deleted (with all its associated data), and a new monitor to be created.
Integrating into the CI/CD
Run the following command to apply a workspace from your CI/CD using Sifflet CLI:
export SIFFLET_BACKEND_URL={mySiffletUrl}
export SIFFLET_TOKEN={mySecretToken}
sifflet code workspace apply --file {workspaceFileName}.yaml --auto-approve
💡 The --auto-approve flag is not necessary before version 0.4.0
Avoid unintended monitor deletionsYou should always review the output of the
plancommand (sifflet code workspace plan --file {workspaceFileName}.yaml) before runningapplywith the--auto-approveflag to avoid unintended monitor deletions
Updated 19 days ago