Practical Example
In this guide we will teach you how to quickly push assets inside Sifflet catalog. In order to efficiently follow this guide, you will need:
- an access token with Admin role. How to create access token in Sifflet ?
- a way of performing API request in your work environment. This guide will provide example using a
curlcommand line input, but you can perform API requests using other tools like Postman.
Creation of a workspace and assets
In this section, we will create a Sifflet workspace and add two catalog assets to this workspace.
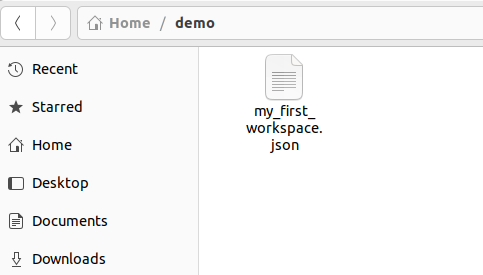
- We will create a file representing our workspace definition in one of the folder of our workspace.
Here you can see I created ademofolder and inside of it I created a file namedmy_first_workspace.json. You can do the same in your environment.
- Once your file is created, you can now open it in a text editor and start defining your workspace content. It is not mandatory, but for increased readibility, make sure to use a text editor that understand JSON standard.
First we want to name our workspace. Let’s not use our imagination and just call it “MyFirstDeclaredWorkspace”. To do so, just write that inside yourmy_first_workspace.jsonfile:
{
  "workspace": "MyFirstDeclaredWorkspace"
}-
Workspace names are unique inside a Sifflet instance, so you can also add custom information to the name to make sure it is not used by someone else. If you are afraid of overriding somebody’s workspace content when pushing yours because you are using an already existing workspace name, you can set the parameter
dryRuntotruein order to examine the changes that will be performed when synchronizing your workspace in Sifflet without actually comitting any change. Once you are sure everything is fine you just have to perform the same API request with thedryRunsetting onfalse. -
We will now add some assets to our workspace. To do so, we are going to populate an array named
assetswith elements. Each element is identified using an unique identifier nameduri. It also needs to have a mandatory primarytype. For more details about URI in general and in Sifflet you should read the dedicated documentation section.
We want to add assets from one of our MongoDB test database inside our workspace. Our MongoDB instance is hosted atsifflet-mongodb-test.eu-west-1.comaddress, on port27017, and the collections we want to put in our workspace are located inside a database namedtestDBon this instance. Their names aresampleCollection1andminimalInputCollection2. They will then be defined by the URIs:
-mongodb://sifflet-mongodb-test.eu-west-1.com:27017/testDB.sampleCollection1
-mongodb://sifflet-mongodb-test.eu-west-1.com:27017/testDB.minimalInputCollection2
We will also give the primary type “Dataset” to our collections. (currently available types are “Dataset”, “Dashboard”, “Pipeline”, “MlModel” and “Generic”).
Ourmy_first_workspace.jsonfile should now look like that:{ "workspace": "MyFirstDeclaredWorkspace", "assets": [ { "uri": "mongodb://sifflet-mongodb-test.eu-west-1.com:27017/testDB.sampleCollection1", "type": "Dataset" }, { "uri": "mongodb://sifflet-mongodb-test.eu-west-1.com:27017/testDB.minimalInputCollection2", "type": "Dataset" } ] }
We could very well push our workspace immediately and it would be perfectly fine. But we are going to add a couple things to it.
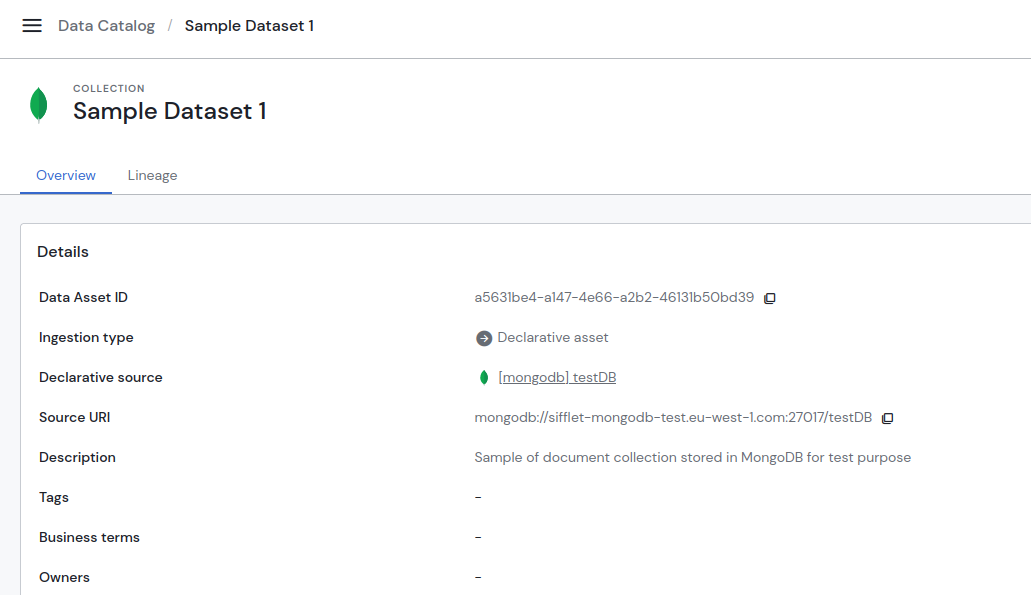
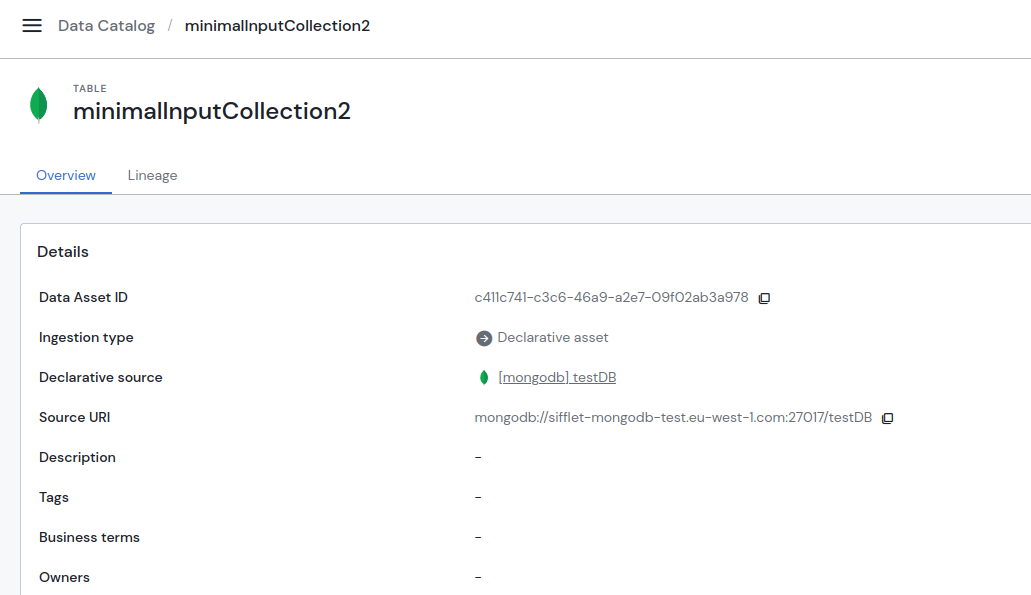
- We will do some small adjustments to our file in order to surface some more information when pushing the workspace. We will focus on the first asset of the file, so you can compare the final result with the minimal input we are using in the second asset.
- First we will add a
nameto the asset so the displayed name is a bit more readable. We call it “ Sample Dataset 1” now. - Then we will add a
subType: in MongoDB it is a collection so we will call it a “collection” so Sifflet has a bit more clue about that. - We add a
descriptionas well: “Sample of document collection stored in MongoDB for test purpose” - And finally we add an
hrefpointing to our collection url (we are putting to the documentation in the example, see the payload, but you can add a real link).
- First we will add a
- Now the content of our file looks like that:
{
  "workspace": "MyFirstDeclaredWorkspace",
  "assets": [
    {
      "uri": "mongodb://sifflet-mongodb-test.eu-west-1.com:27017/testDB.sampleCollection1",
      "name": "Sample Dataset 1",
      "type": "Dataset",
      "href": "https://www.mongodb.com/docs/manual/core/databases-and-collections",
      "subType": "collection",
      "description": "Sample of document collection stored in MongoDB for test purpose"
    },
    {
      "uri": "mongodb://sifflet-mongodb-test.eu-west-1.com:27017/testDB.minimalInputCollection2",
      "type": "Dataset"
    }
  ]
}- We are now ready to sync our brand new workspace on our Sifflet instance. Open a terminal (or another way to perform an API request) and simply type (from the folder containing your
demofolder):
curl --request POST \
     --url https://{your_sifflet_tenant_host_here}.siffletdata.com/api/v1/assets/sync?dryRun=false \
     --header 'accept: application/json' \
     --header 'authorization: Bearer {your_access_token_here}'  \
     --header 'content-type: application/json' \
--data '@demo/my_first_workspace.json'- In that particular case we set the parameter
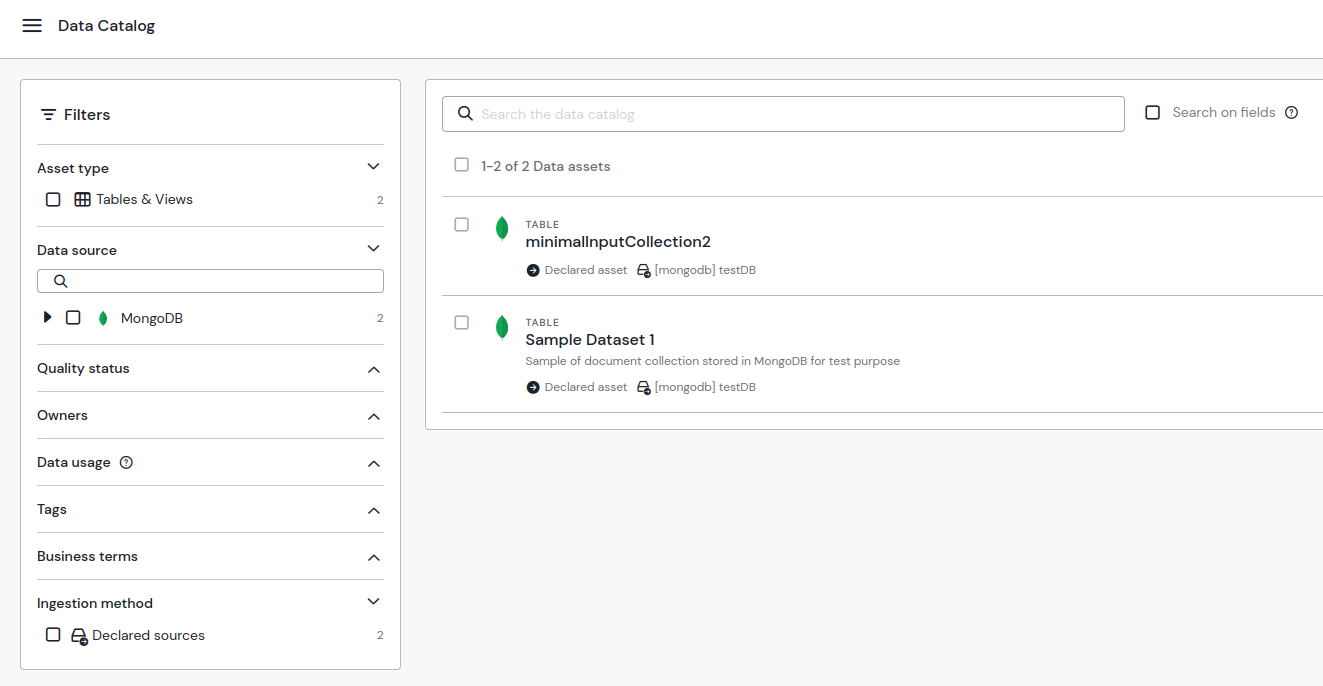
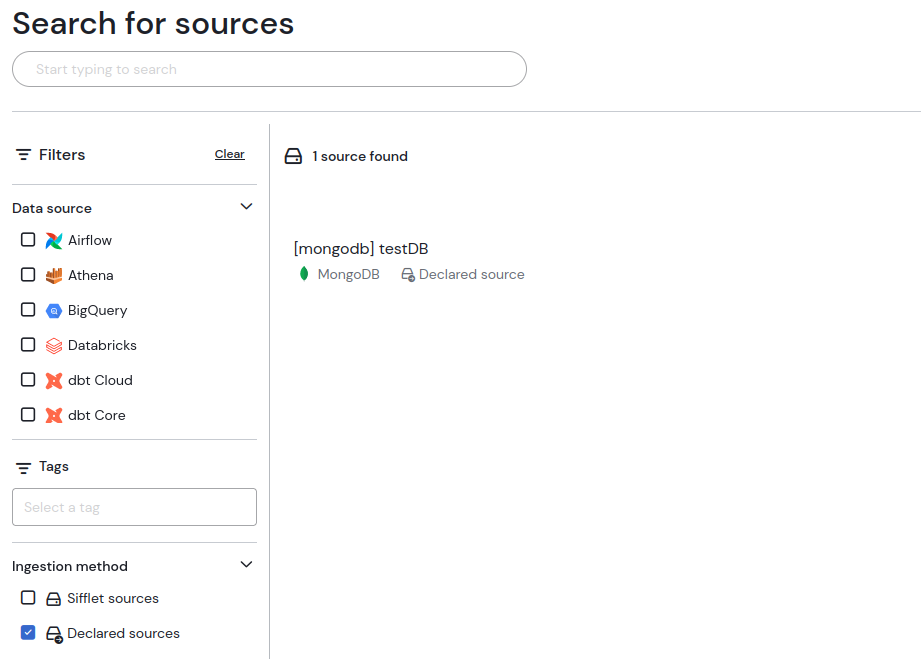
dryRunatfalsedirectly, which means the assets and workspace will be created. If you want to check what will happen because you are afraid to erase somebody else workspace, you can set it totrue. You will get a report of what changes are expected after writing the assets. When you feel like all is fine and you are ready to go for real, just perform the request again withdryRunset tofalse. - You can now go to your Sifflet instance UI and browse the Catalog. You should find your 2 assets. You can find a source that has been created to contain your new catalog assets if you navigate to the Integration section.
Updating my workspace by adding and removing assets
Now that we have created our workspace, we are now going to update it, by adding some assets and removing some others.
- First I want to remove my 2nd MongoDB asset because I don’t actually need it in my catalog. I will simply remove its reference inside the file
my_first_workspace.json. It should now look like this:
{
  "workspace": "MyFirstDeclaredWorkspace",
  "assets": [
    {
      "uri": "mongodb://sifflet-mongodb-test.eu-west-1.com:27017/testDB.sampleCollection1",
      "name": "Sample Dataset 1",
      "type": "Dataset",
      "href": "https://www.mongodb.com/docs/manual/core/databases-and-collections",
      "subType": "collection",
      "description": "Sample of document collection stored in MongoDB for test purpose"
    }
  ]
}- We have a Metabase integration that contains a couple assets I want to push in Sifflet. We are going to add them to our workspace.
- Our metabase instance is located at
sifflet-metabase-test.eu-west-1.comon port8443. Our assets are ordered inside a metabase collection (a folder) named SampleData. We can use that information to craft our assets uri based on their name. - The first asset is named “model1” and we will use the “Generic”
typefor it, as there is no non-generic type that will do here. We will label itssubType”model”. - The second asset is a dashboard named “dashboard1” and we will use the “Dashboard” type for it.
- We add a couple more information our JSON file, here is now what it looks like:
- Our metabase instance is located at
{
  "workspace": "MyFirstDeclaredWorkspace",
  "assets": [
    {
      "uri": "mongodb://sifflet-mongodb-test.eu-west-1.com:27017/testDB.sampleCollection1",
      "name": "Sample Dataset 1",
      "type": "Dataset",
      "href": "https://www.mongodb.com/docs/manual/core/databases-and-collections",
      "subType": "collection",
      "description": "Sample of document collection stored in MongoDB for test purpose"
    },
    {
      "uri": "metabase://sifflet-metabase-test.eu-west-1.com:8443/SampleData.model1",
      "name": "Sample Model 1",
      "type": "Generic",
      "subType": "model",
      "href": "https://www.metabase.com/docs/latest/data-modeling/models",
      "description": "Sample of a Metabase model for test purpose"
    },
    {
      "uri": "metabase://sifflet-metabase-test.eu-west-1.com:8443/SampleData.dashboard1",
      "name": "Sample Dashboard 1",
      "type": "Dashboard",
      "href": "https://www.metabase.com/docs/latest/dashboards/introduction",
      "description": "Sample of a Metabase dashboard for test purpose"
    }
  ]
}- We can now sync our workspace again, using the same API request as previously:
curl --request POST \
     --url https://{your_sifflet_tenant_host_here}.siffletdata.com/api/v1/assets/sync?dryRun=false \
     --header 'accept: application/json' \
     --header 'authorization: Bearer {your_access_token_here}'  \
     --header 'content-type: application/json' \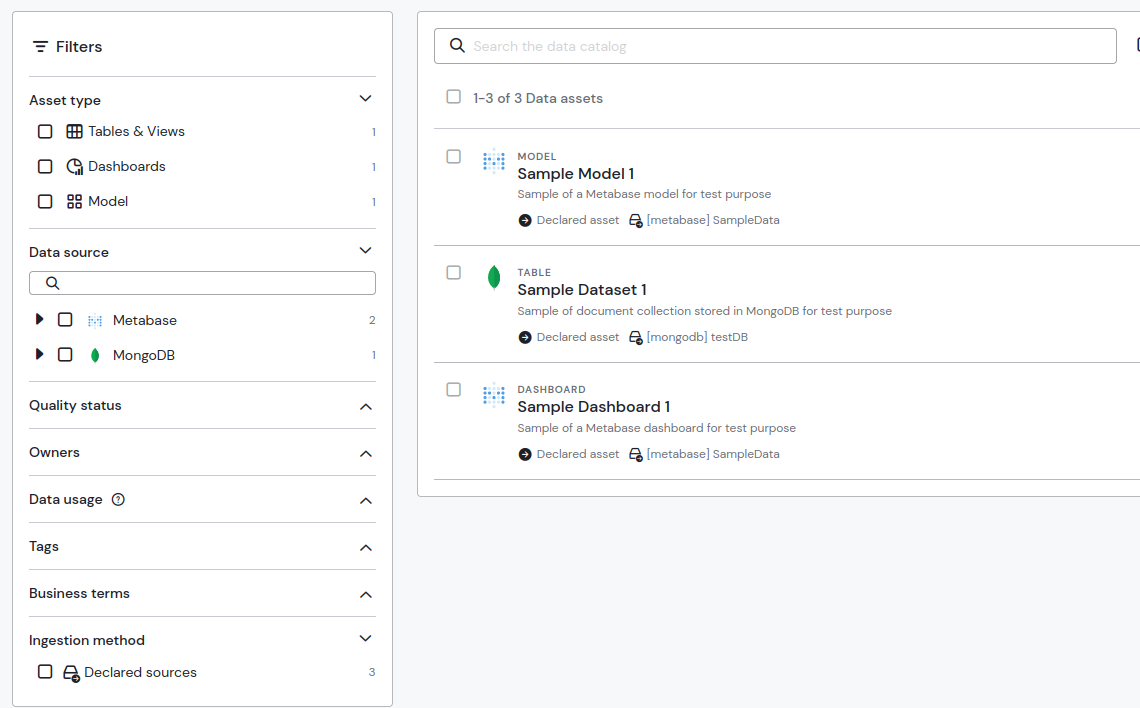
--data '@demo/my_first_workspace.json'- If you browse the Sifflet Catalog again you will find your new assets. The MongoDB collection we removed has been removed from the catalog. If you browse the Integration page, you can find the source containing your new Metabase asset.
Adding sources information
You can improve the information displayed on the Integration page by adding those information to your workspace payload. We are going to show how to do so in this part of the guide.
- First you need to add a sources field inside your
my_first_workspace.jsonfile. It is an array, same as theassetsfield. It should look like this.
{
  "workspace": "MyFirstDeclaredWorkspace",
  "assets": [
    {
      "uri": "mongodb://sifflet-mongodb-test.eu-west-1.com:27017/testDB.sampleCollection1",
      "name": "Sample Dataset 1",
      "type": "Dataset",
      "href": "https://www.mongodb.com/docs/manual/core/databases-and-collections",
      "subType": "collection",
      "description": "Sample of document collection stored in MongoDB for test purpose"
    },
    {
      "uri": "metabase://sifflet-metabase-test.eu-west-1.com:8443/SampleData.model1",
      "name": "Sample Model 1",
      "type": "Generic",
      "subType": "model",
      "href": "https://www.metabase.com/docs/latest/data-modeling/models",
      "description": "Sample of a Metabase model for test purpose"
    },
    {
      "uri": "metabase://sifflet-metabase-test.eu-west-1.com:8443/SampleData.dashboard1",
      "name": "Sample Dashboard 1",
      "type": "Dashboard",
      "href": "https://www.metabase.com/docs/latest/dashboards/introduction",
      "description": "Sample of a Metabase dashboard for test purpose"
    }
  ],
  "sources": [

  ]
}- Now we will add one entry for each of the sources we have in the Integration page inside our file. Each source will be identified by its
urifield, same as assets. You can easily write the uri of a source based on the uri of one of the assets it contained.- For example our MongoDB source has
mongodb://sifflet-mongodb-test.eu-west-1.com:27017/testDBasuri. It corresponds to the radical of the uri of the asset it containsmongodb://sifflet-mongodb-test.eu-west-1.com:27017/testDB.sampleCollection1. - We simply add a
nameand adescriptionto our sources. Our file should now look like that:
- For example our MongoDB source has
{
  "workspace": "MyFirstDeclaredWorkspace",
  "assets": [
    {
      "uri": "mongodb://sifflet-mongodb-test.eu-west-1.com:27017/testDB.sampleCollection1",
      "name": "Sample Dataset 1",
      "type": "Dataset",
      "href": "https://www.mongodb.com/docs/manual/core/databases-and-collections",
      "subType": "collection",
      "description": "Sample of document collection stored in MongoDB for test purpose"
    },
    {
      "uri": "metabase://sifflet-metabase-test.eu-west-1.com:8443/SampleData.model1",
      "name": "Sample Model 1",
      "type": "Generic",
      "subType": "model",
      "href": "https://www.metabase.com/docs/latest/data-modeling/models",
      "description": "Sample of a Metabase model for test purpose"
    },
    {
      "uri": "metabase://sifflet-metabase-test.eu-west-1.com:8443/SampleData.dashboard1",
      "name": "Sample Dashboard 1",
      "type": "Dashboard",
      "href": "https://www.metabase.com/docs/latest/dashboards/introduction",
      "description": "Sample of a Metabase dashboard for test purpose"
    }
  ],
  "sources": [
    {
      "uri": "metabase://sifflet-metabase-test.eu-west-1.com:8443/SampleData",
      "name": "Metabase Sample Data Collection",
      "description": "This is a sample datasource representing a Metabase collection"
    },
    {
      "uri": "mongodb://sifflet-mongodb-test.eu-west-1.com:27017/testDB",
      "name": "MongoDB test database",
      "description": "This is a sample datasource representing a MongoDB database"
    }
  ]
}- We can now sync our workspace again, using the same API request as previously:
curl --request POST \
--url https://{your_sifflet_tenant_host_here}.siffletdata.com/api/v1/assets/sync?dryRun=false \
--header 'accept: application/json' \
--header 'authorization: Bearer {your_access_token_here}' \
--header 'content-type: application/json' \
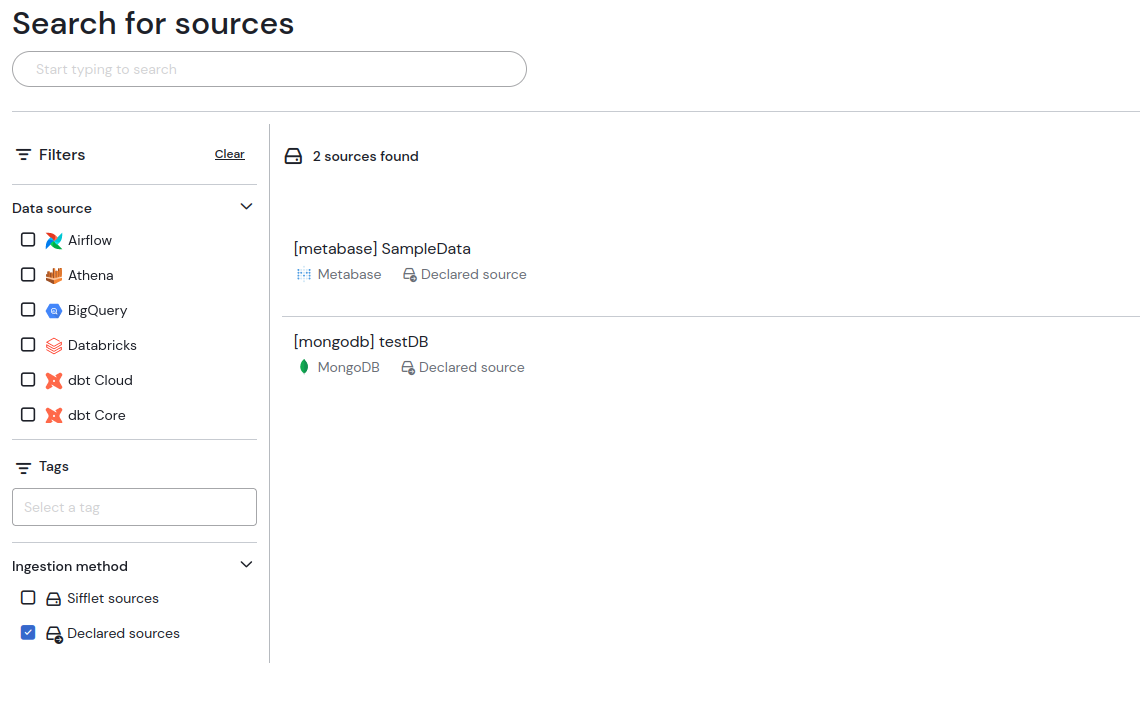
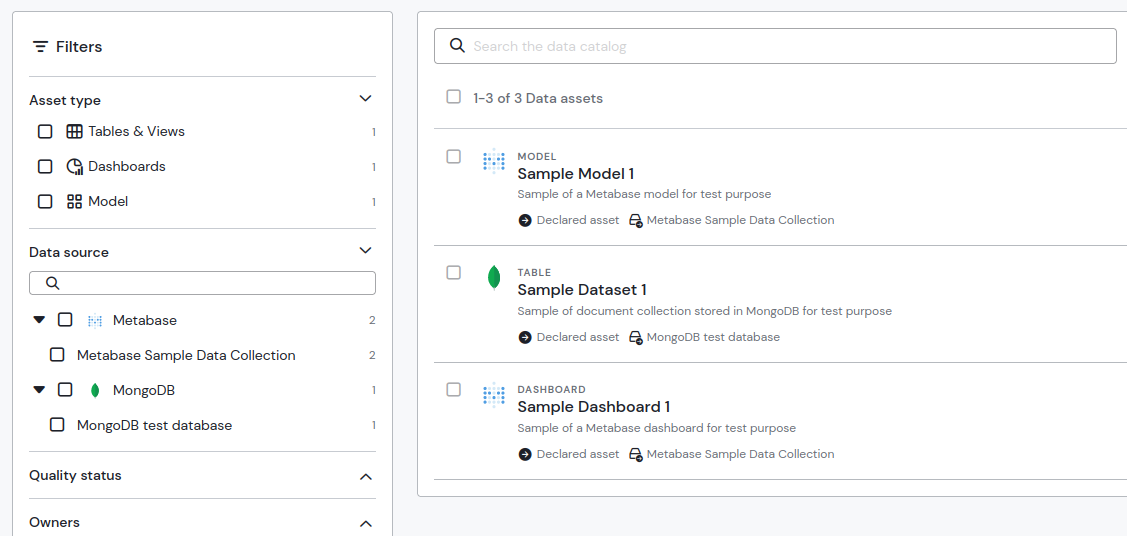
--data '@demo/my_first_workspace.json'- You can navigate through the Integration page and see the elements you have pushed; the previous sources have been renamed on the Integration page and inside the catalog. If you browse a specific source page, you will find the description we set as well.

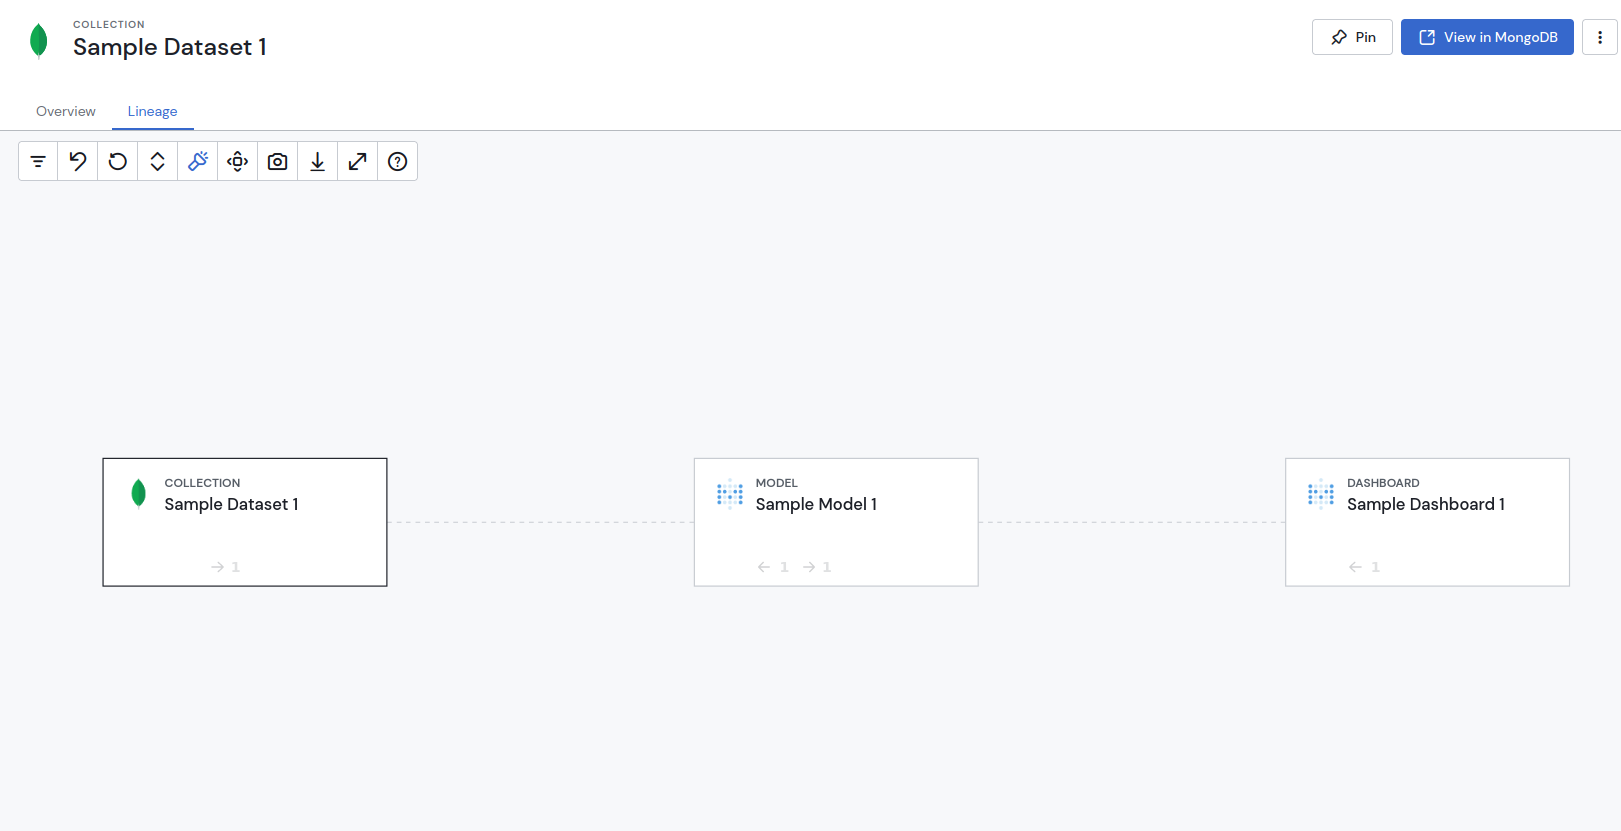
Add lineage between your assets
You can apply lineage to your assets using the same API; in our case our Metabase model has been made from our MongoDB table, and a dashboard as been added with the information of the model in Metabase.
- We want to represent this link in Sifflet. In order to do that, we are going to add a section named
lineagesin our file and simply add tuples representing link. - Each tuple has an upstream element and a downstream element, or a parent element and a children, or a source and a target, depending on the vocabulary you are used to. Here the upstream element has to be represented in the field
fromand the downstream in the fieldto. Those fields have to contain an URI, using the same format you have found previously in the assets definition. - The resulting file looks like that:
{
  "workspace": "MyFirstDeclaredWorkspace",
  "assets": [
    {
      "uri": "mongodb://sifflet-mongodb-test.eu-west-1.com:27017/testDB.sampleCollection1",
      "name": "Sample Dataset 1",
      "type": "Dataset",
      "href": "https://www.mongodb.com/docs/manual/core/databases-and-collections",
      "subType": "collection",
      "description": "Sample of document collection stored in MongoDB for test purpose"
    },
    {
      "uri": "metabase://sifflet-metabase-test.eu-west-1.com:8443/SampleData.model1",
      "name": "Sample Model 1",
      "type": "Generic",
      "subType": "model",
      "href": "https://www.metabase.com/docs/latest/data-modeling/models",
      "description": "Sample of a Metabase model for test purpose"
    },
    {
      "uri": "metabase://sifflet-metabase-test.eu-west-1.com:8443/SampleData.dashboard1",
      "name": "Sample Dashboard 1",
      "type": "Dashboard",
      "href": "https://www.metabase.com/docs/latest/dashboards/introduction",
      "description": "Sample of a Metabase dashboard for test purpose"
    }
  ],
  "sources": [
    {
      "uri": "metabase://sifflet-metabase-test.eu-west-1.com:8443/SampleData",
      "name": "Metabase Sample Data Collection",
      "description": "This is a sample datasource representing a Metabase collection"
    },
    {
      "uri": "mongodb://sifflet-mongodb-test.eu-west-1.com:27017/testDB",
      "name": "MongoDB test database",
      "description": "This is a sample datasource representing a MongoDB database"
    }
  ],
  "lineages": [
    {
      "from": "mongodb://sifflet-mongodb-test.eu-west-1.com:27017/testDB.sampleCollection1",
      "to": "metabase://sifflet-metabase-test.eu-west-1.com:8443/SampleData.model1"
    },
    {
      "from": "metabase://sifflet-metabase-test.eu-west-1.com:8443/SampleData.model1",
      "to": "metabase://sifflet-metabase-test.eu-west-1.com:8443/SampleData.dashboard1"
    }
  ]
}- We can now sync our workspace again, using the same API request as previously:
curl --request POST \
     --url https://{your_sifflet_tenant_host_here}.siffletdata.com/api/v1/assets/sync?dryRun=false \
     --header 'accept: application/json' \
     --header 'authorization: Bearer {your_access_token_here}'  \
     --header 'content-type: application/json' \
--data '@demo/my_first_workspace.json'- If you browse your catalog and select the MongoDB asset, you can navigate to the lineage panel of the asset and see that your 3 assets are now linked:
Delete workspace
Every good things have an end, and now we want to clean up our workspace. To fully remove our workspace we can simply make an API request to the dedicated deletion endpoint with the following command. The Sifflet server will proceed with deleting your assets and you workspace and cleaning up your sources.
curl --request DELETE \
     --url https://{your_sifflet_tenant_host_here}.siffletdata.com/api/v1/assets/MyFirstDeclaredWorkspace?dryRun=false \
     --header 'authorization: Bearer {yourtokenhere}'
Thanks for following this guide, you have learned a lot about using Sifflet API to push assets into the catalog. For more information, check other documentation sections !
Updated 8 months ago